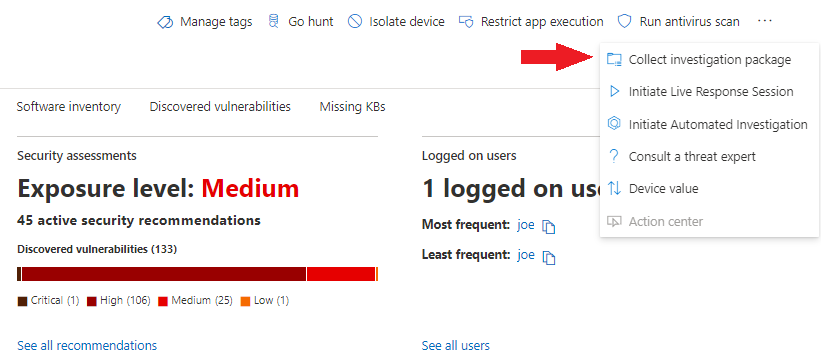
When it comes to doing a forensic investigation, we want to take the approach of looking wide, and then digging deeper into the data. This helps you avoid going down rabbit holes as much as possible and allows you to easily pivot to other data you’ve collected or taken note of. Now, for today’s example… Continue reading Investigation with Defender for Endpoint, Investigation Package , Part 1
Category: Azure
Intune diagnostic retrieval
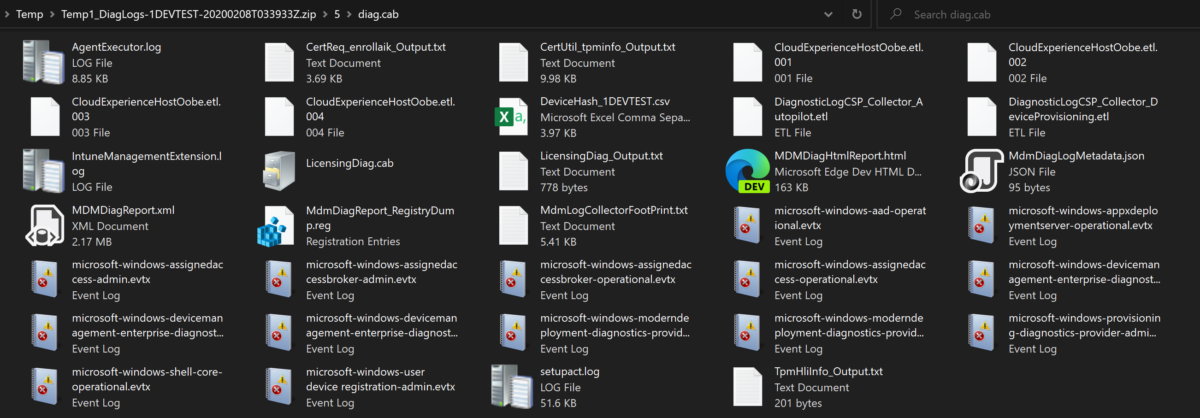
Wrote this a while ago, never posted it because I have an issue thinking none of my posts are ready, so here it is anyway. I’ll likely add to this at some point. I read Oliver Kieselbach’s post here a while back and just wanted to add some information to the flow. Looking at the CSP Reference guide… Continue reading Intune diagnostic retrieval
Azure Policy: Your Enterprise Azure Resource Guardrails!

Introduction: There are numerous conversations surrounding Azure Policy. This post will provide information to accompany those conversations. This post will be a living and constantly modified document throughout the product development. Post Purpose: The purpose of this document is to explain the following: What is Azure Policy Intended Audience: The intended audience will be Azure… Continue reading Azure Policy: Your Enterprise Azure Resource Guardrails!
Managing Windows 10 with Intune – AutoPilot Reset

Managing Windows 10 with Intune – AutoPilot Reset Playing with the AutoPilot Reset and essentially refreshing my home laptops over and over, I thought why not just document and share it. I’m coming at this from a “Devices already managed” approach, so I did not pre-register my hardware ID’s for the full white glove experience.… Continue reading Managing Windows 10 with Intune – AutoPilot Reset
Azure Security Center : Playbooks!
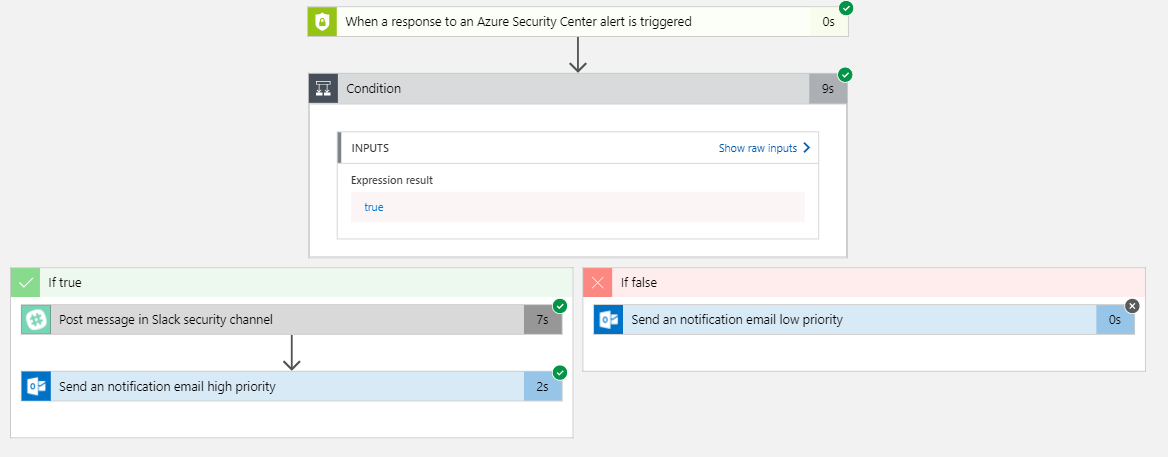
Azure Security Center Playbooks First off, what is a Playbook in Azure Security Center (ASC)? A Security Playbook is a pre-established and scripted set of actions that can be taken in the event of a specific alert within your Azure tenant (think of System Center Orchestrator Runbooks, but for Azure, aimed towards increased Security for… Continue reading Azure Security Center : Playbooks!
Deploy SQL CU w/ rollback package
Had to write something up for a customer, so I thought I’d share that. Nothing mind blowing here, just the simple process of deploying a CU for SQL 2016 SP1 with an uninstall package to showcase the roll back of said CU. The customers DBA team was looking to see how they could leverage SCCM… Continue reading Deploy SQL CU w/ rollback package
ConfigMgr Cloud Management Gateway!
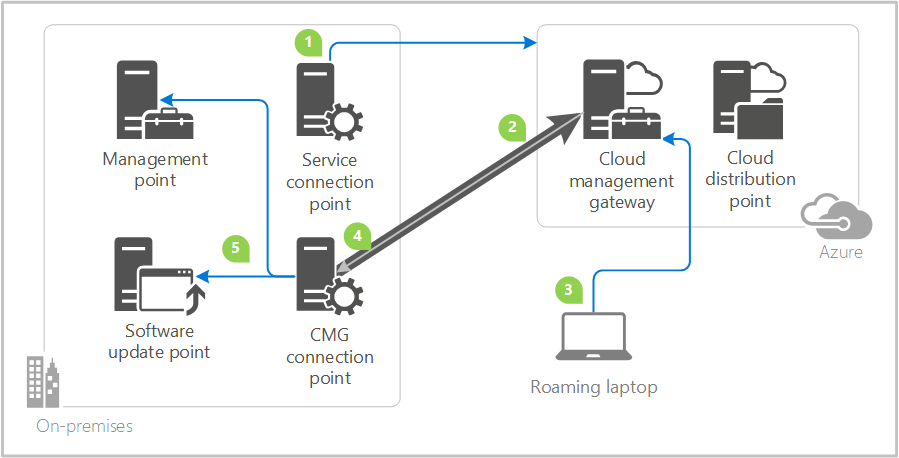
Good day everyone! Recently I spoke at Microsoft Tech Talk – Dallas on this topic, and I wanted to put together a quick informative post on some of the prerequisite steps along with implementation steps necessary to deploy the SCCM Cloud Management Gateway! This is an amazing feature that is truly a new way to… Continue reading ConfigMgr Cloud Management Gateway!
SCCM Managed Office 365 Clients, Versioning
A topic I’ve been asked about often the last few weeks has been around Office 365 Client versioning, more specifically when being managed with SCCM. Ensuring Office 365 Clients are properly set to be managed via SCCM is important for consistent versioning results.
A few cross checks first, make sure your site is set to pull Office 365 Client updates down:
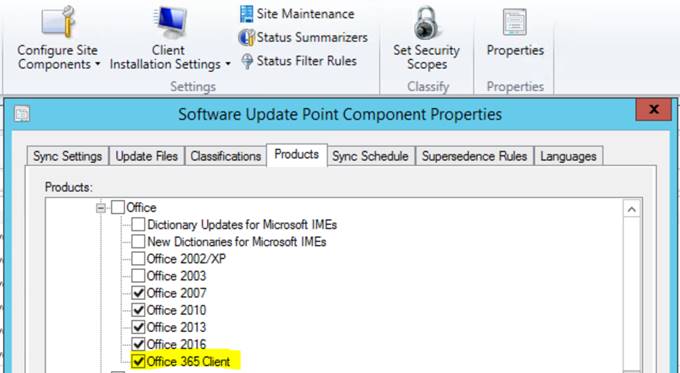
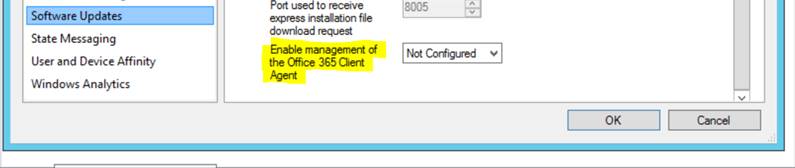
Make sure you have the highlighted field below set to “Yes”, that will ensure Configuration manager is able to update the clients as defined (hopefully) in their configuration when deployed\installed. This is assuming those clients are set to use SCCM as their point of contact for updates which we’ll cover in this blog.
![]()
When you’re creating the configuration.xml for your Office 365 deployment, make sure it contains the below highlighted segment, this will ensure the client knows who to talk to for updates.
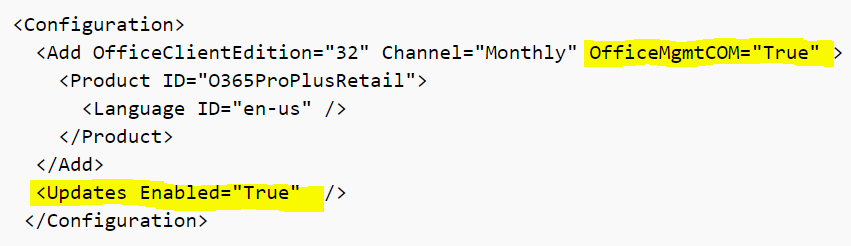
Another note, if you want your users to see that there are updates pending, add the <Updates Enabled=”True” /> portion. As you can imagine, when set to False, clients still receive updates from SCCM, but end users will not see any pending update notifications.
See https://docs.microsoft.com/end-user-update-notifications-for-office-365-proplus for more information on update notifications.
Requirements for SCCM to manage Office 365 Client Updates:
- System Center Configuration Manager, update 1602 or later
- An Office 365 client – Office 365 ProPlus, Visio Pro for Office 365, Project Online Desktop Client, or Office 365 Business
- Supported channel version for Office 365 client. For more details, see Release information for updates to Office 365 ProPlus
- Windows Server Update Services (WSUS) 4.0 You can’t use WSUS by itself to deploy these updates. You need to use WSUS in conjunction with Configuration Manager
- The hierarchy’s top level WSUS server and the top-level Configuration Manager site server must have internet access.
- On the computers that have the Office 365 client installed, the Office COM object is enabled.
Let’s get some perspective on client versioning in an environment now. Check under ”Software Library > Office 365 Client Management” to see where your versioning stands.
A lot of what’s expected here should be dependent on what testing you may have in place. Do you have a test group on monthly? Who might be on Semi-annual? Don’t be caught off-guard to see something like what’s depicted further below.
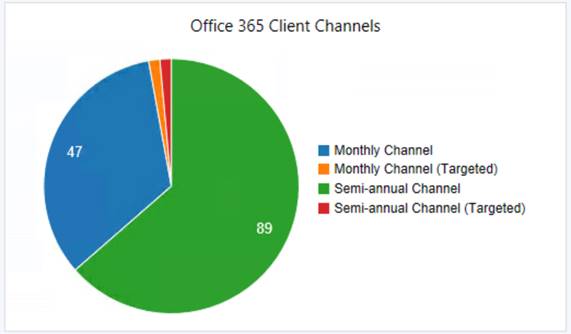
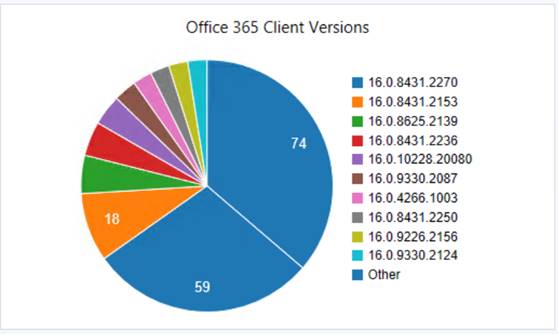
If the expectation would be for all clients to be on “Semi-annual Chanel”, and all version numbers to be some variant of 1803 which would be build 9126, or 16.0.9126.XXXX, then we have some things to dig into. (Office Pro Plus Versions by Date)
Here is the expected behavior when devices are correctly set to be managed by SCCM:
“When Microsoft publishes a new Office 365 client update to the Office Content Delivery Network (CDN), Microsoft simultaneously publishes an update package to Windows Server Update Services (WSUS). Then, Configuration Manager synchronizes the Office 365 client update from the WSUS catalog to the site server. Configuration Manager can then download the update and distribute it to distribution points selected by the administrator. The Configuration Manager desktop client then tells the Office client where to get the update and when to start the update installation process.”
I stress the above bolded area as it is vital to ensure the clients are set to use SCCM properly.
If you feel that most of what has been covered so far remains true for you, the most likely culprit is probably still some mixture of inconsistent settings. Good news though, there are a few easy ways we can make sure we have the client settings set correctly where needed.
The Microsoft preferred method for computers that have already had Office Pro Plus deployed, would be the Group Policy option.
The other option, and frankly the “Cooler” one, is the PowerShell option. See the following for the PowerShell Option – https://blogs.technet.microsoft.com/odsupport/2017/05/10/how-to-switch-channels-for-office-2016-proplus/
That should be a great start and hopefully answers a lot of the basic questions around getting Office 365 Client versioning in order. Please comment with any comments, questions, or anything I may have missed! After all, that is the purpose of being a community : )
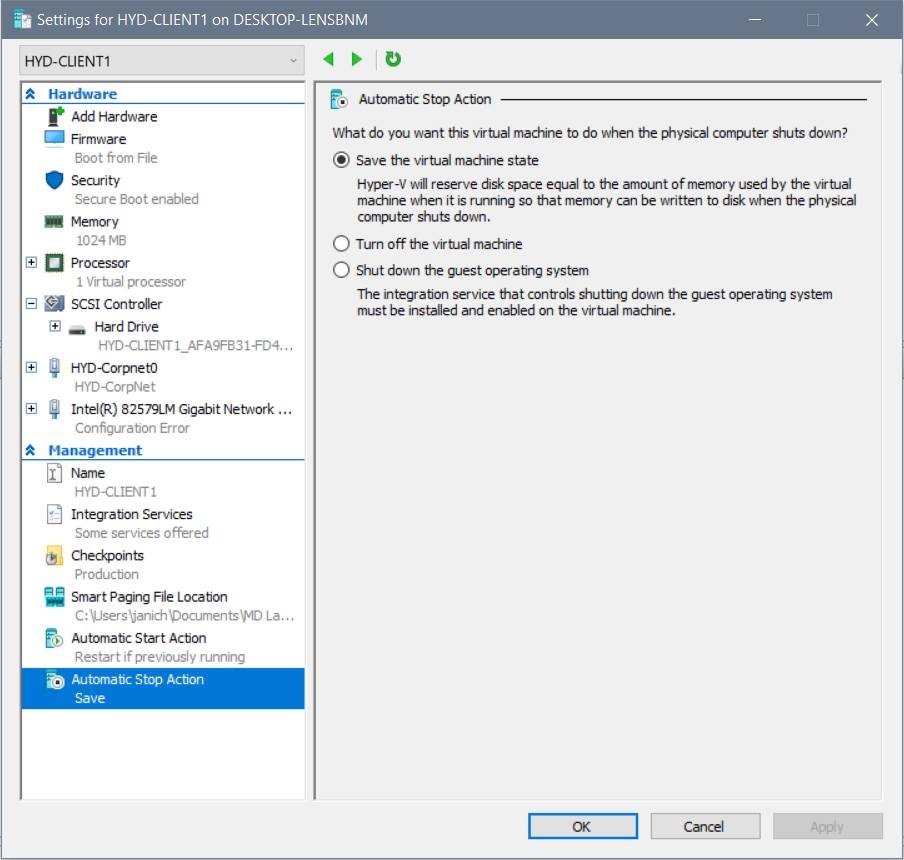
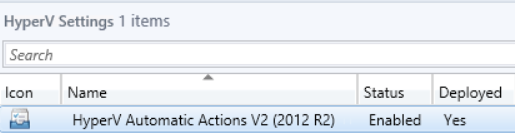
Hyper-V Baseline Change – AutomaticStopAction

Was recently asked by a customer to make a global Hyper-V change on VM’s having the wrong AutomaticStopAction setting, across many HV Hosts. My tool of choice, SCCM Baseline! (Yes, SCVMM is a better option here, but that’s not an option in their environment…)
To familiarize everyone, this is what we are changing:
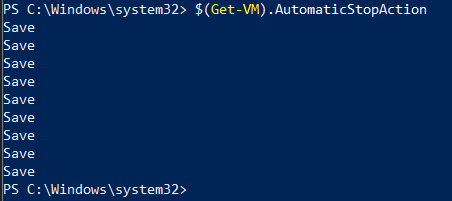
Let’s hop over to PowerShell and get familiar with the cmdlets needed for this. Let’s check the value first:
$(Get-VM -Name HYD-CLIENT1).AutomaticStopAction
![]()
For what’s it worth, running just $(Get-VM).AutomaticStopAction will return the state for all VM’s on the host.
Good source for Hyper-V cmdlets : https://docs.microsoft.com/powershell/module/hyper-v
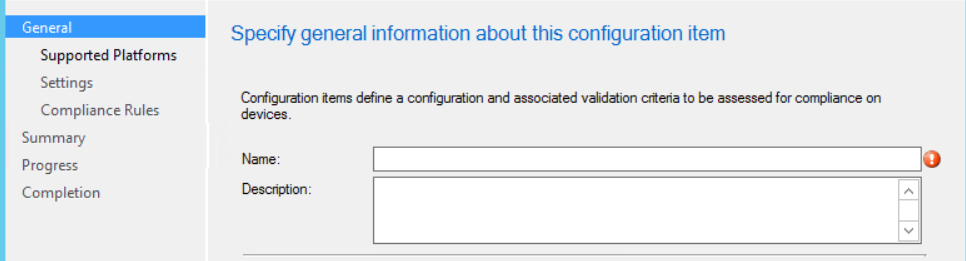
Create and name the baseline, we’ll come back to it later:
Go ahead and create a new configuration item, name it, platforms you want to limit it to, etc. We’ll focus primarily on the “Settings” and “Compliance Rules”:
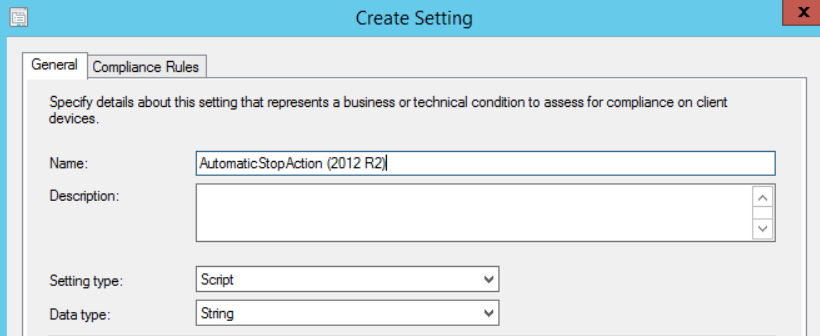
For “Setting type” and “Data type”, we’ll choose Script and String as shown below:
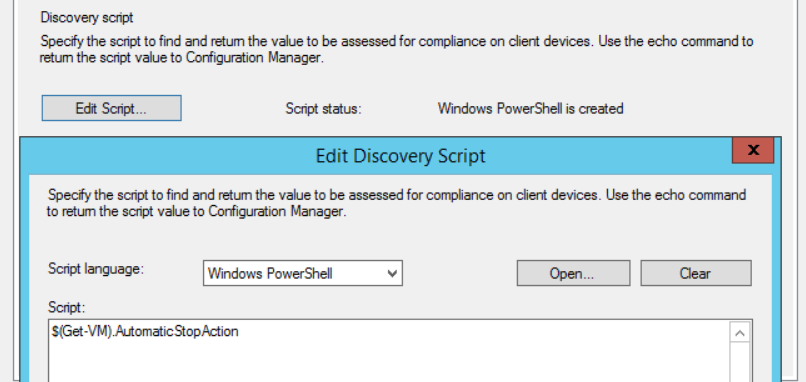
Since we know what value we want and how to grab that, we’ll use that for our “Discovery Script”:
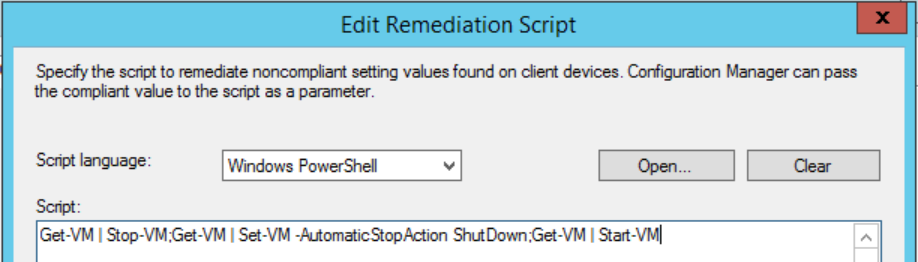
And as you may have guessed, we’ll use the Set version of that cmdlet to ensure the desired value is set:
Get-VM | Stop-VM;Get-VM | Set-VM -AutomaticStopAction ShutDown;Get-VM | Start-VM
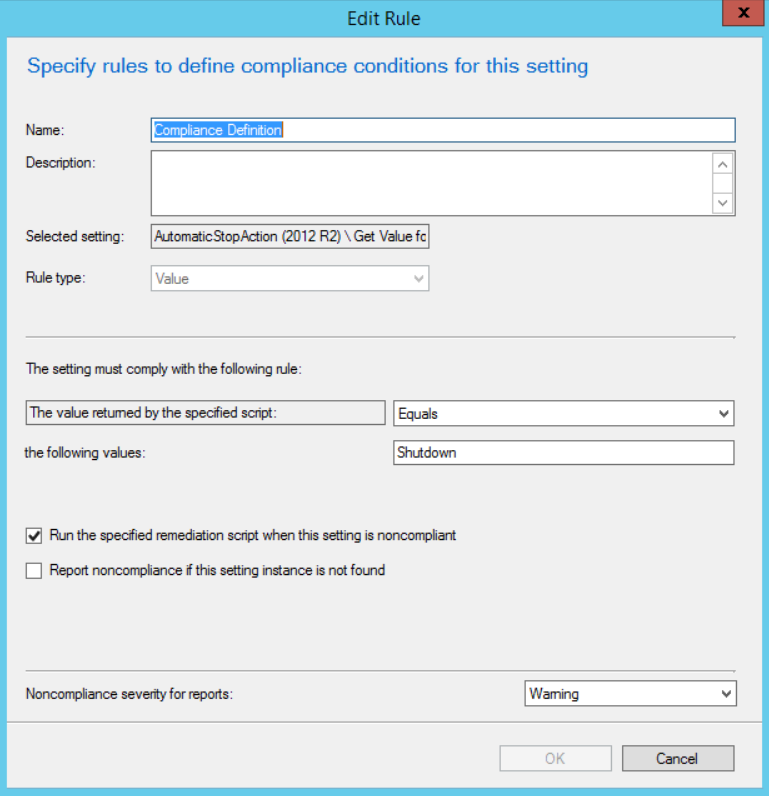
Now choose the “Compliance Rules” tab, this can also be accessed from the main properties window shown below this. Double click or highlight and:
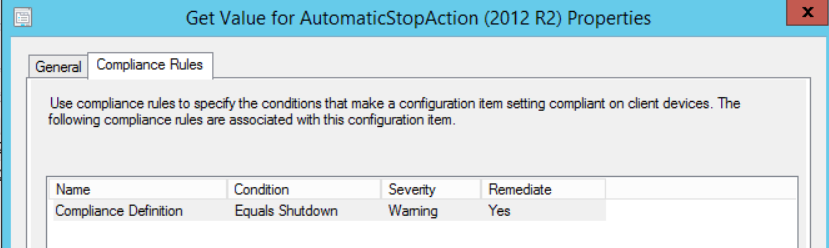
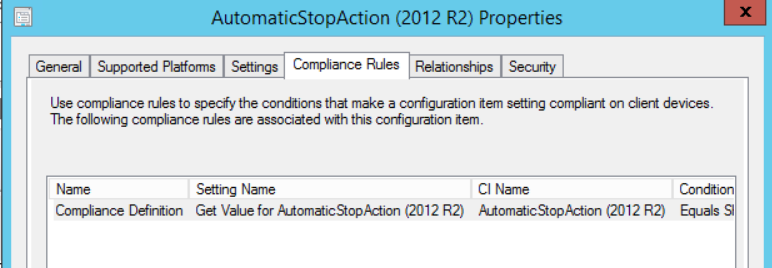
Here we are defining the conditions for a machine to report as compliant when measured against this baseline, make sure you check the box to “Run the specified remediation script when this setting is noncompliant”:
That’s it for the configuration item!

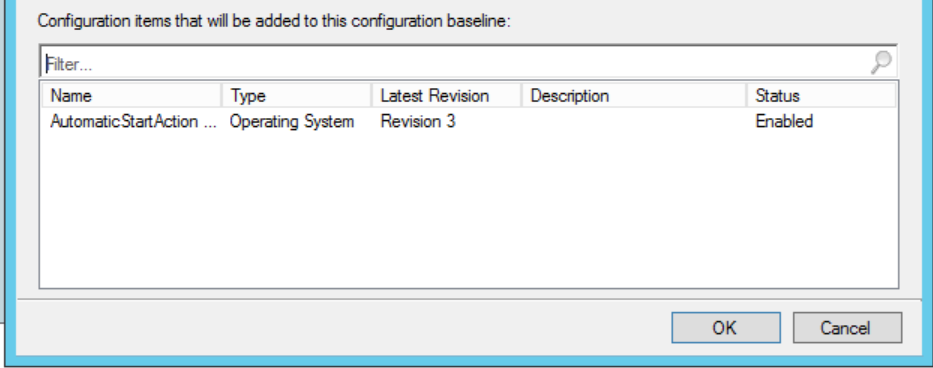
Last step, head back to the Configuration Baseline and add the configuration item we just created, by adding it to the “Evaluation Conditions” as shown below:
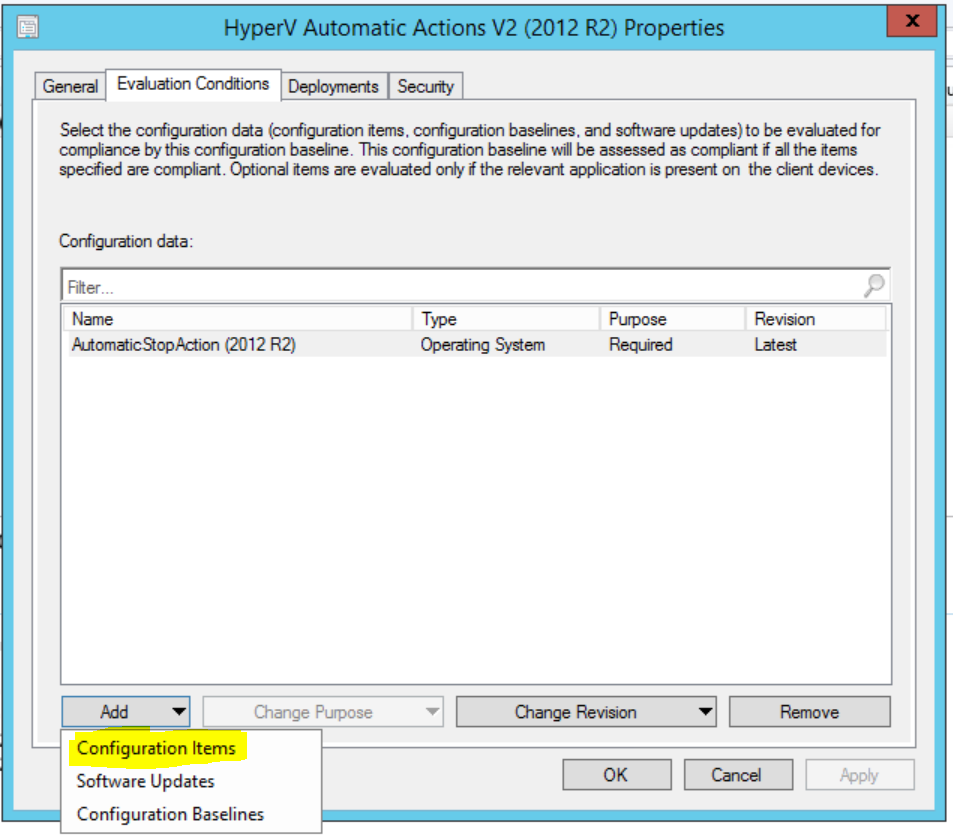
Filter the list to find the newly created item, select it and click “Add”:

Choose “OK” and you’re done!
Please comment with any questions about this procedure or any general baseline questions, we’re here to help!
July 2018 Windows Patches – Stop 0xd1 Errors
Patch Scenarios
Microsoft has released a solution for the Stop 0xd1 errors that some customers encountered after the July 10th update release. The offering of Windows updates released on July 10th will resume.
Suggested actions for customers:
- Customers who have previously deployed Windows updates released on July 10 and did not encounter any Stop 0x1d errors have no new action to take.
- Customers who did not install Windows updates released on July 10 are encouraged to apply the original updates released on July 10, and monitors for Stop 0x1d errors.
- Only customers who encounter a Stop 0xd1 error after installing Windows updates released on July 10 are encouraged to install one of the following update packages to resolve the Stop 0x1d symptom:
Patching Steps
If you have already performed the below steps of rolling back the July Cumulative Updates (CU), you will need to resinstall the CU before installing the new patch.


Starting from having to install the July CU again, we’ll do the following:
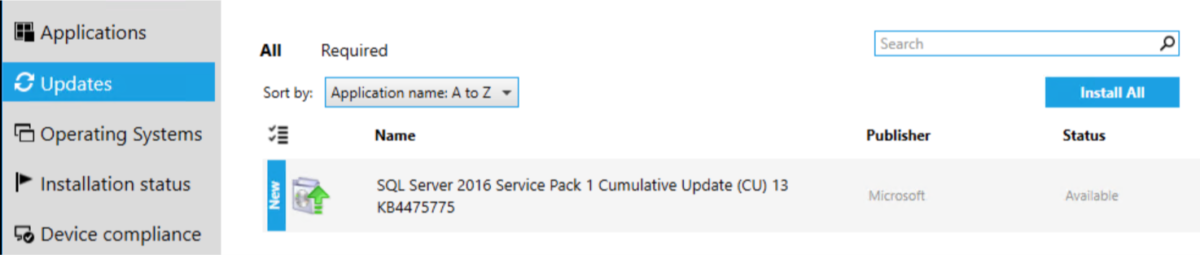
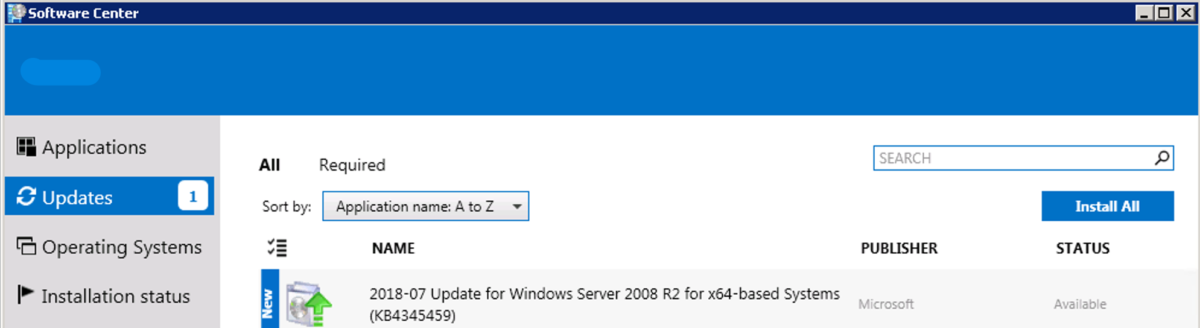
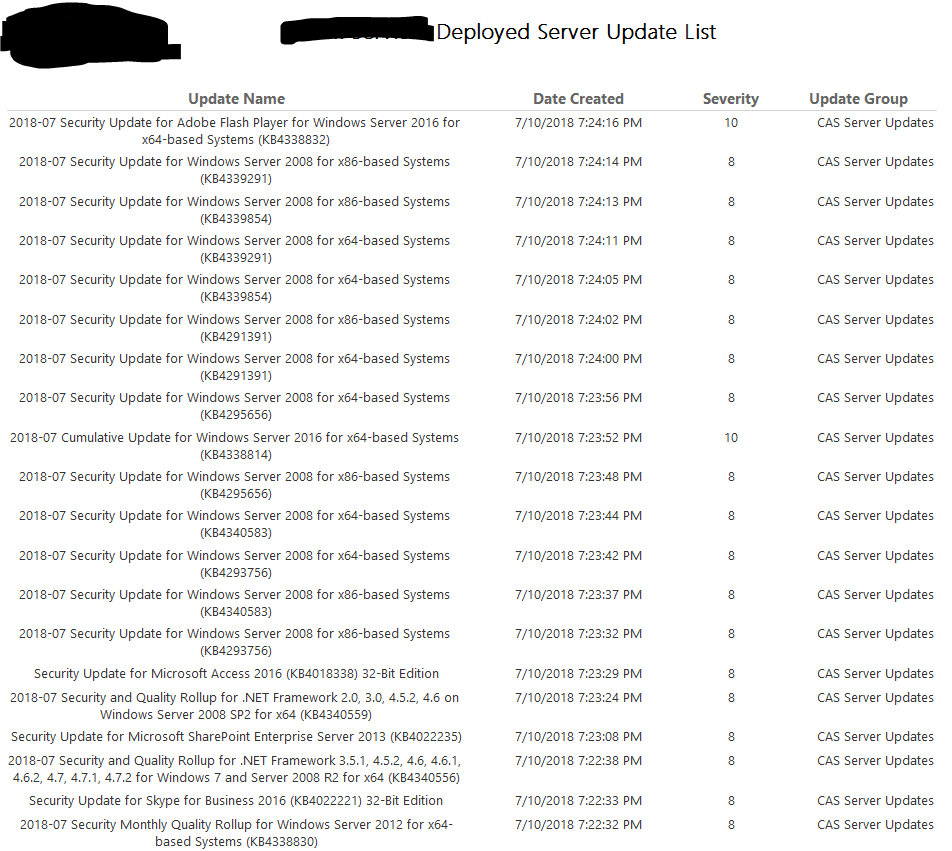
From the Configuration manger app, run:
![]()
Choose “Install All”:

Since I deployed this patch as available, you can see the client had to download the patch, rather then it being downloaded already, waiting for a MW. The reason I made it available is because not ever server needed the fix, and it was easier to just have it offered to the admins if they needed it.

Post installation reboot required:

Once both patches are installed, well see the folllowing:

If you still have the CU installed and are experiencing the issues decribed in this article, install just the additional patch:

Rinse and repeat for your specific OS version.
*Please note this patch will require a reboot in most cases.*
Custom Reports 101 – An Example from the Real World – Report on Software Updates in a Software Update Group
Custom Reports 101 – An Example from the Real World – Report on Software Updates in a Software Update Group.
Good day everyone, my name is Trevor Stuart. I am one of the authors and operational leads of moderncloudmanagement.com. Today I wanted to share a post on a real-world client request that came my way. To shed a little background, I am a typical Tech Guy– specializing in SCCM (12+ years), Windows 10 (RTM +), Azure (5+ years), and Cyber Security (learning and loving it). I work alongside Joe Anich (the original author and operational lead of moderncloudmanagement.com) daily for this customer.
Scenario:
Whilst I was on my way out for the evening, the manager I report to for this particular customer asked if I was able to create a custom report that quickly showed all software updates that were in a particular software update group – group it, and highlight the ones that have been modified/added since the last time the software update group had been deployed. Sounds simple right? Let’s dive right in to see if that’s true or not!
Technical Deep Dive:
First thing that must be accomplished is to identify where in the SCCM DB the data for this request is stored. Now I am not going to sit here and assume everyone reading this understands the SCCM DB Schema to an expert level, so I want to share a common trick I teach customers during training on custom report creation. There is a component in all hierarchies called SMS Provider, the provider essentially takes what you do in the SCCM admin console, which is normally executed in WQL, translates that to SQL and executes it against the DB. So, how does this help? Big time!
Go to: Software Library – Software Updates – Software Update Groups – Double click your SUG to show the members of it.
This is the content you’re looking to identify, now quickly go to your log directory on you site server <installation directory>\Program Files\Microsoft Configuration Manager\Logs – within that directory you will see SMSProv.log – open it. 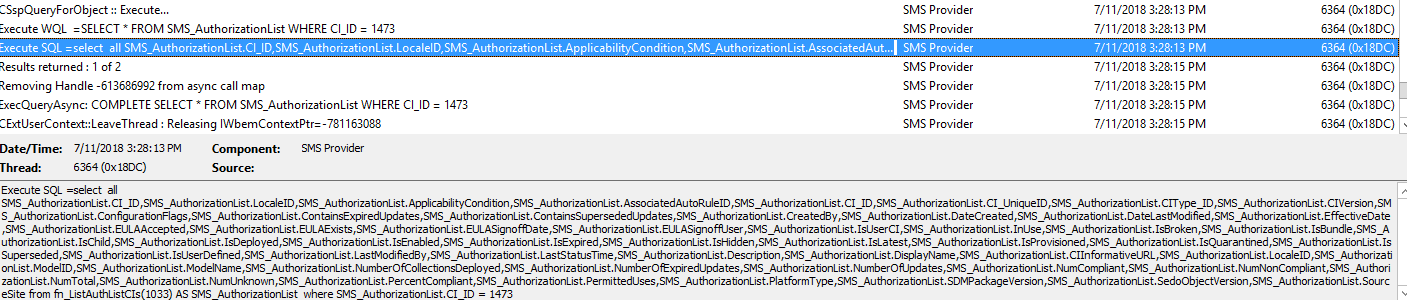
You can see from the highlighted line the precise SQL command that SMS Provider is executing against your DB to bring you what you visually see in the console. Here we are seeing all the columns it’s selecting and most importantly where it’s selecting this information from within the DB. Keep this log up on that line – we will need it later.
Moving on, you will need to open up SQL Server Management Studio and make a connection to your Site DB. Once connected go ahead and open up a new query window. I normally start off by doing a few “Select *” statements from the views I see within the SMSProv.log execution like below:
Text:
select * from vSMS_SoftwareUpdatesPackage_List
select * from vSMS_CIRelation
select * from v_AuthListInfo
select * from v_CIToContent
Returned Results:
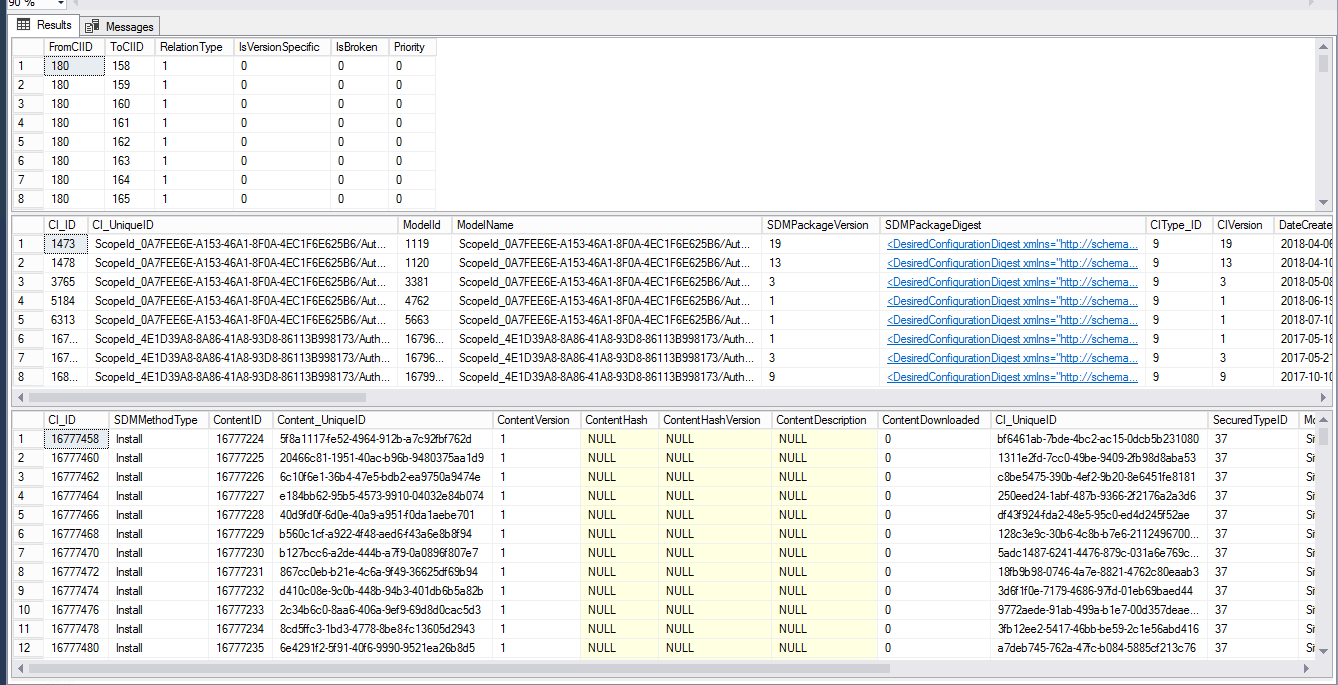
As you can see here most of our information comes from these four views. Now what we must do is start pruning out what we do not need vs what we are trying to obtain in order to start forming this custom query to then build a report from. What you can learn from these select statements is your Name, CI_ID, etc. all of which will be crucial to the success of this report. I was quickly able to identify the CI_ID that I wanted to target along with sorting by date released to meet the other requirement from the customer.
Text:
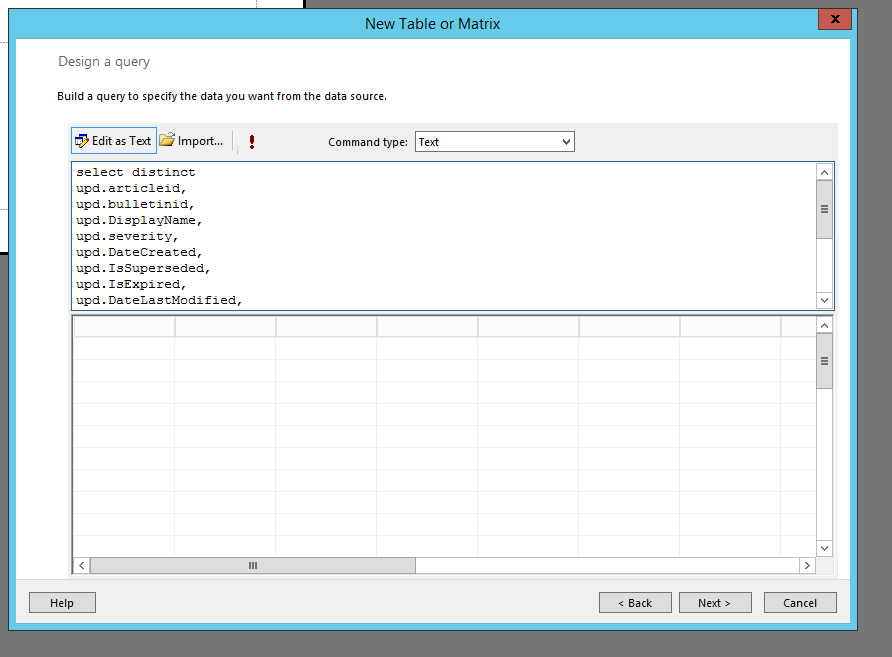
select distinct
upd.articleid,
upd.bulletinid,
upd.DisplayName,
upd.severity,
upd.DateCreated,
upd.IsSuperseded,
upd.IsExpired,
upd.DateLastModified,
al.Title,
al.ci_id
from vSMS_CIRelation as cr
inner join fn_listupdatecis(1033) upd on upd.ci_id = cr.tociid and cr.relationtype =1
inner join v_CIToContent cc on cc.CI_ID=upd.CI_ID
inner join v_AuthListInfo al on al.ci_id=cr.FromCIID
where al.CI_ID = 1473
order by upd.DateCreated desc
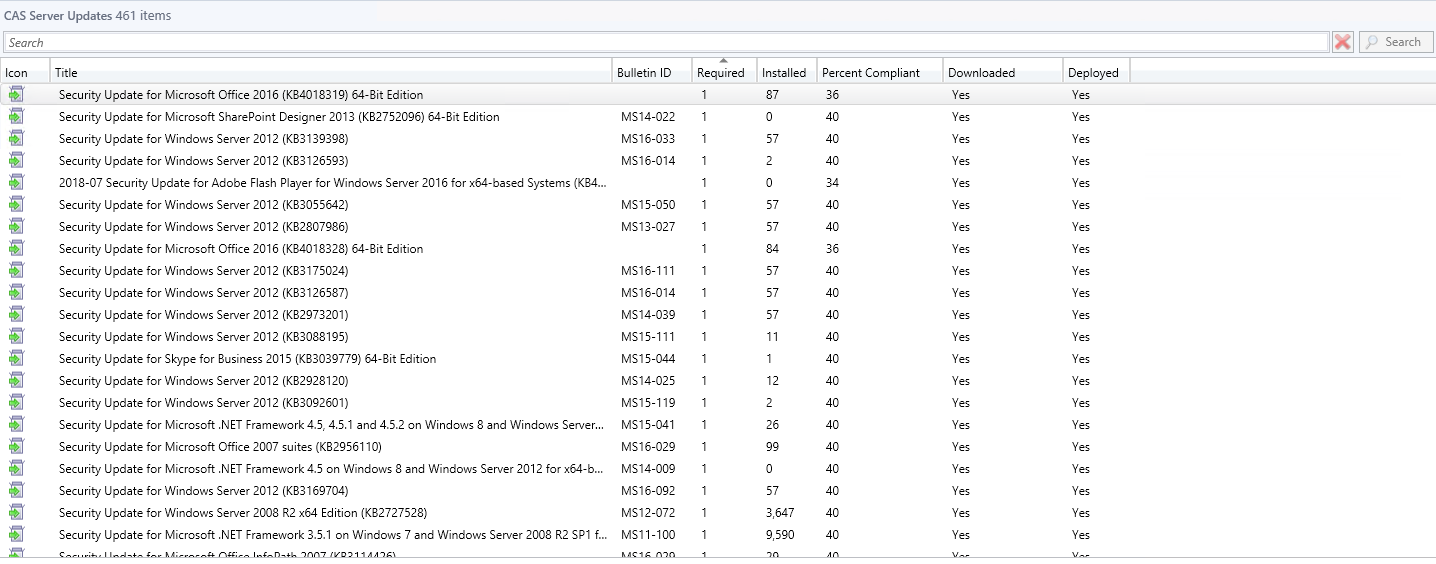
Results (461 Rows Returned which match what we visually saw in the SCCM Console):
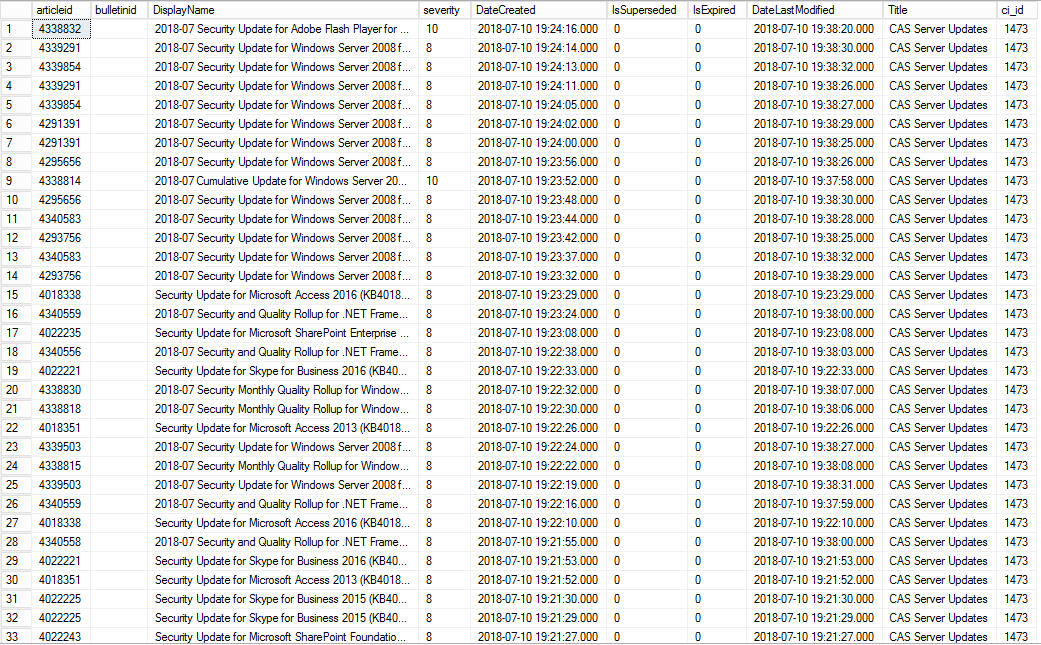
The above results provided me with everything I needed from a requirement perspective. So, at this point I know that I’m clear to move onto Report Builder, merely copying the query and taking it with me.
Next up we will open Report Builder (don’t worry, Report Builder isn’t all that difficult after all you’ll shortly see!), and follow the Wizard below:
1. Within “New Report” – Click “Table or Matrix Wizard”, that will bring up the following window:
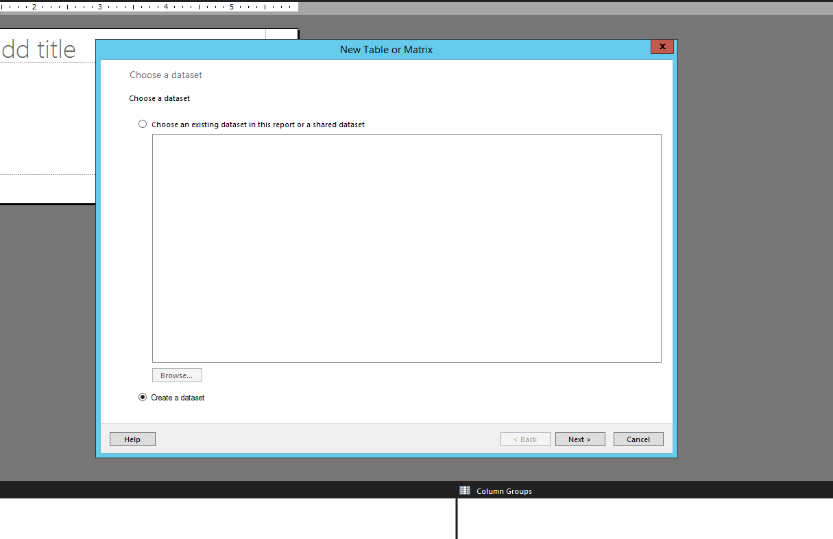 2. Allow “Create a dataset” to remain selected and click Next. This will bring the following window:
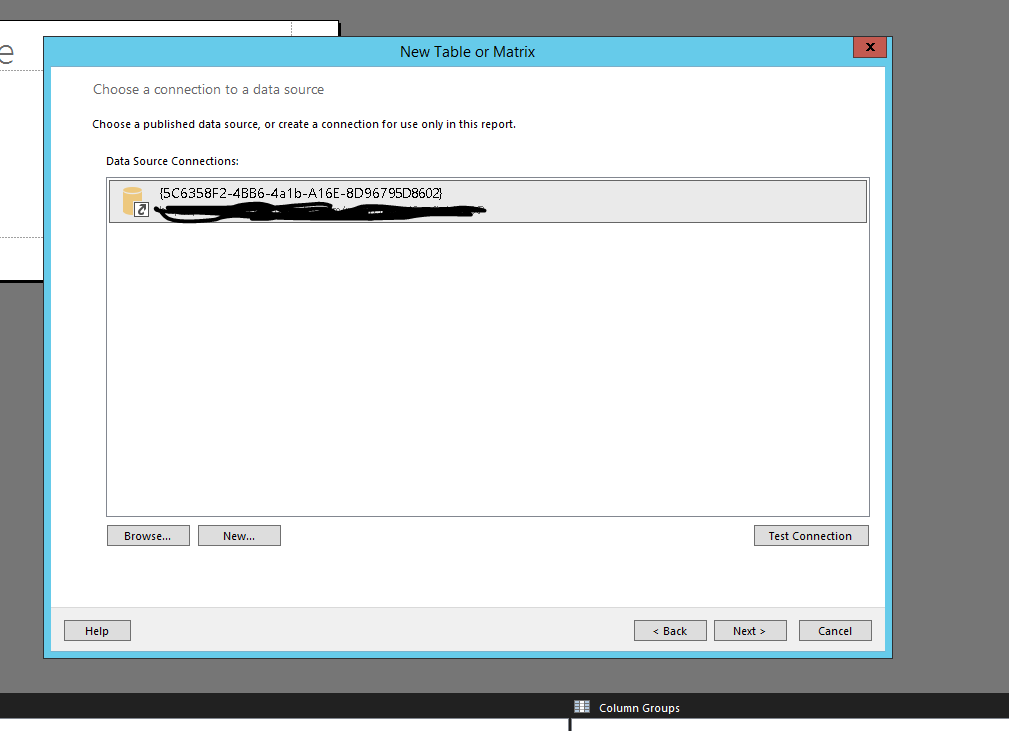 3. It should automatically identify the data source that’s mapped to your report server, at this point click “Next” and that will bring you to the following window:
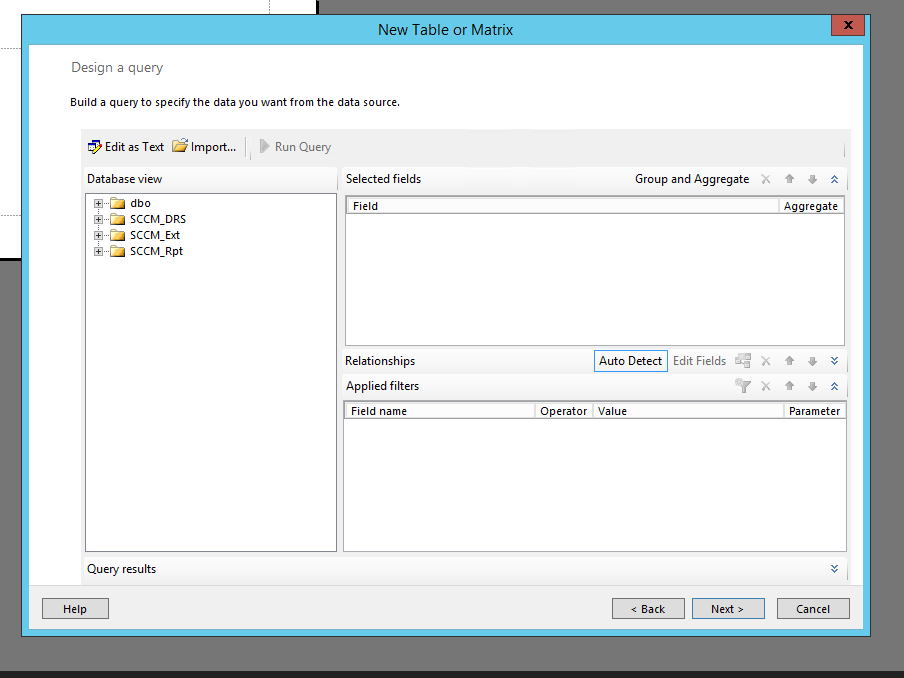 4. Now we are getting somewhere! At this point you will select “Edit as Text” which will bring you to the following window:
 5. Remember that query we created in SQL? Let’s go ahead and copy and paste that into this window like the following:
 6. After successfully pasting, please click “Next” and you’ll be presented with the following window:
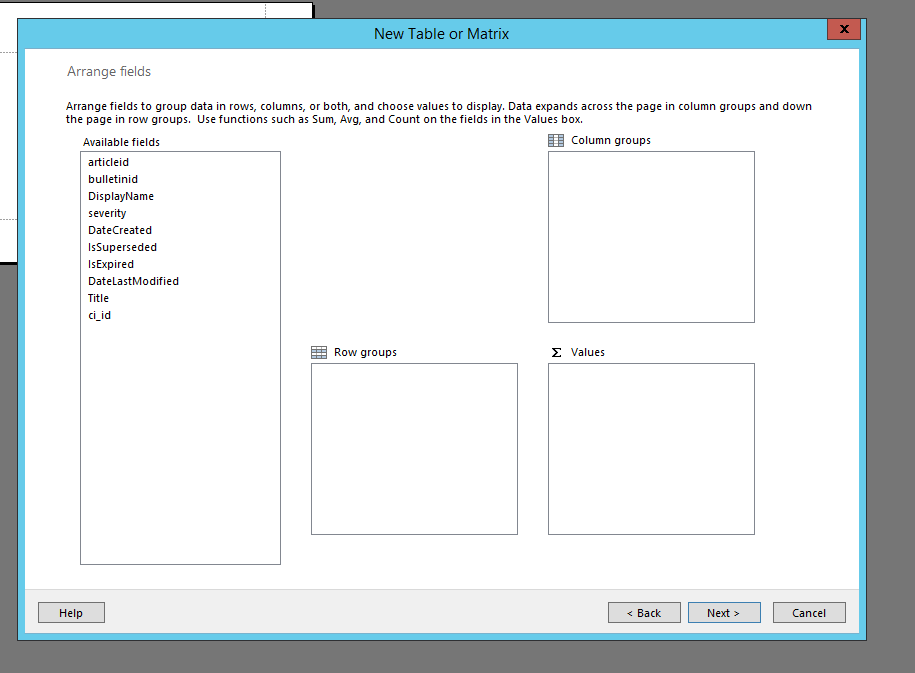 7. You will see numerous available fields in which you will be able to drag and drop into Columns, Rows, or Values. For basic configurations I normally just drag the appropriate fields into the “Values” box like below:
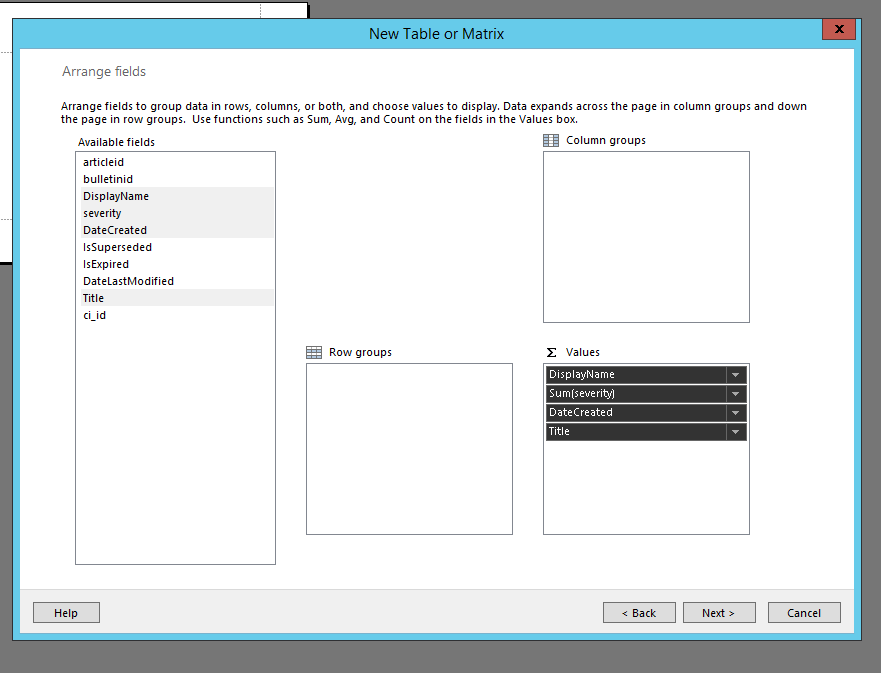 8. Once the desired fields are in “Values”, click Next and you’ll see the following screen:
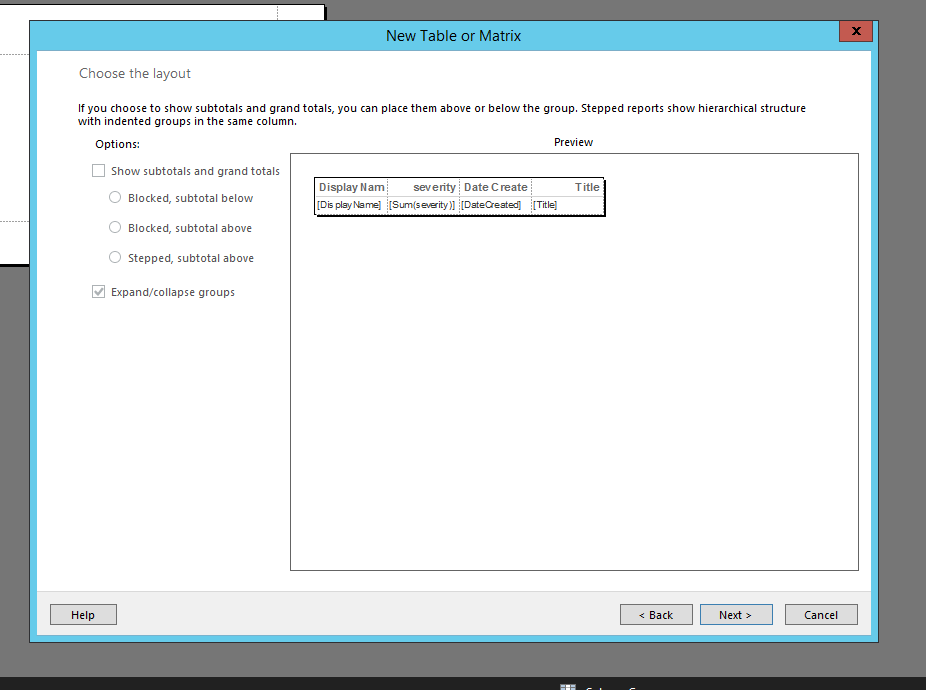
This will provide you a high-level look at what you’re table will look like once completed – go ahead and click “Next”, then “Finish” on the following screen.
9. You’ll now be brought into the Report Designer window where you will see the beginnings of your report!
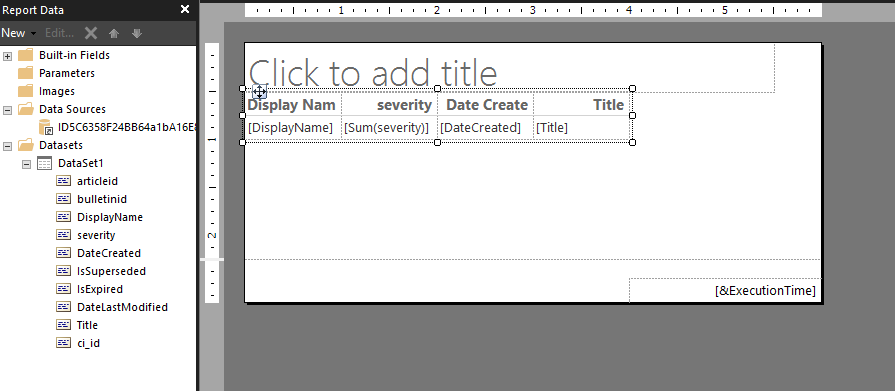 10. From this point on you can customize the look and feel of the report as you deem fit. I normally expand the size so that all of the information is presented in a readable manner, I change the fonts, alignment, and add custom branding per each customer. At the end – the results look like the following (Customer Scrubbed Out):
 11. Finally, go ahead and save the report where you’d like within your report server and you’re officially complete!
I was able to provide the URL where this report can be run to the manager of this customer, with all requirements met, and accepted! I have various other custom SQL queries that I will be posting at a later date, but feel free to request custom SCCM reports here: Custom SCCM Report Requests & Discussion – and we will do our best to provide the SQL statements for the data you’re trying to obtain.
Thanks for your time! Like, and share! See you all soon.
- Trevor
PART 2 – Firmware Deployment for Spectre-Meltdown Protection
This is part 2 to the original article titled Addressing the Spectre Meltdown Vulnerability where we covered the process of deploying the Spectre-Meltdown protection with Baseline. In this article we will discuss the firmware aspect of the process.
Contents
Step 1 – Deploy updated firmware
Step 2 – Understanding levels of protection
Step 1 – Deploy updated firmware
First things first, let’s go grab the firmware. HPE ProLiant DL380 Gen9:
https://support.hpe.com/hpsc/swd/public/detail?swItemId=MTX_b229638a12b34c61b1f441aa51
Apologies if some of you are beyond some of this, but I like to make documentation for my 20-year-old self, so I’m going to include a few basics. When I download exe’s, I like to run them in a command prompt with a /? to see what switches it allows, as shown below:
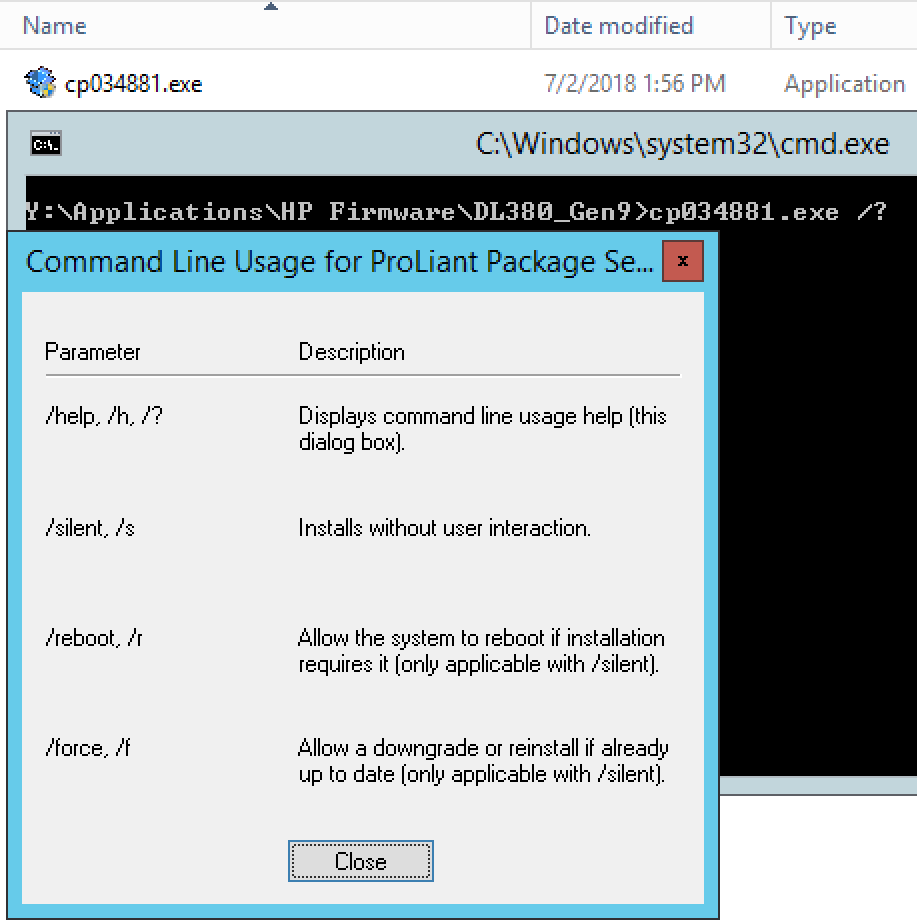
The switches will come into play a bit later when we package it up in SCCM, for now, just run the exe by itself in a test environment if you can. Always nice to see how it installs, time it takes, reboot time, etc.
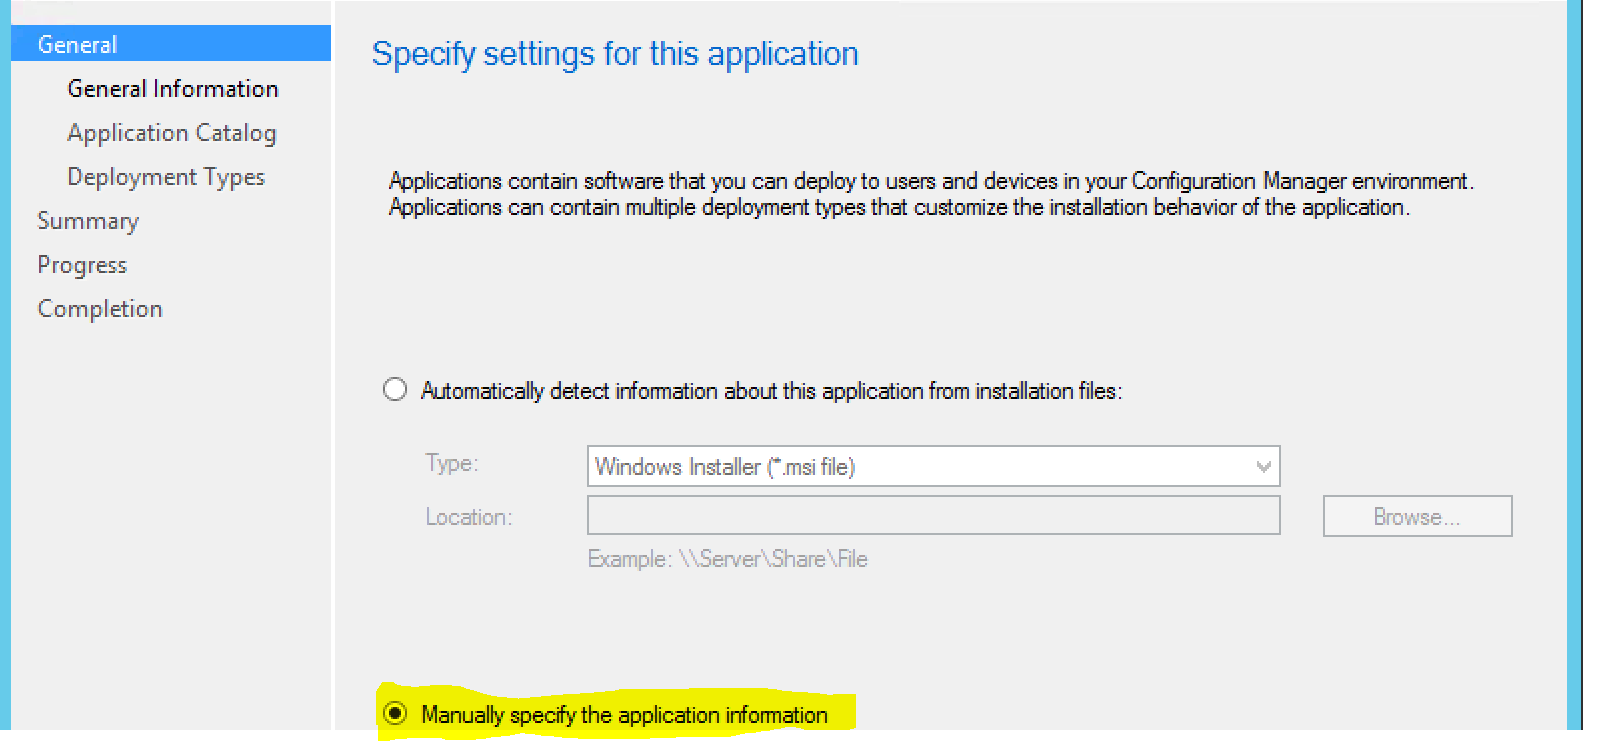
Once testing is complete, we can now package the firmware. Head over to the console, Software Library > Application Management > Applications. Create the corresponding folder as you wish and choose “Create Application”.

We’ll manually choose the application information as it’s an exe:
Enter General Information:

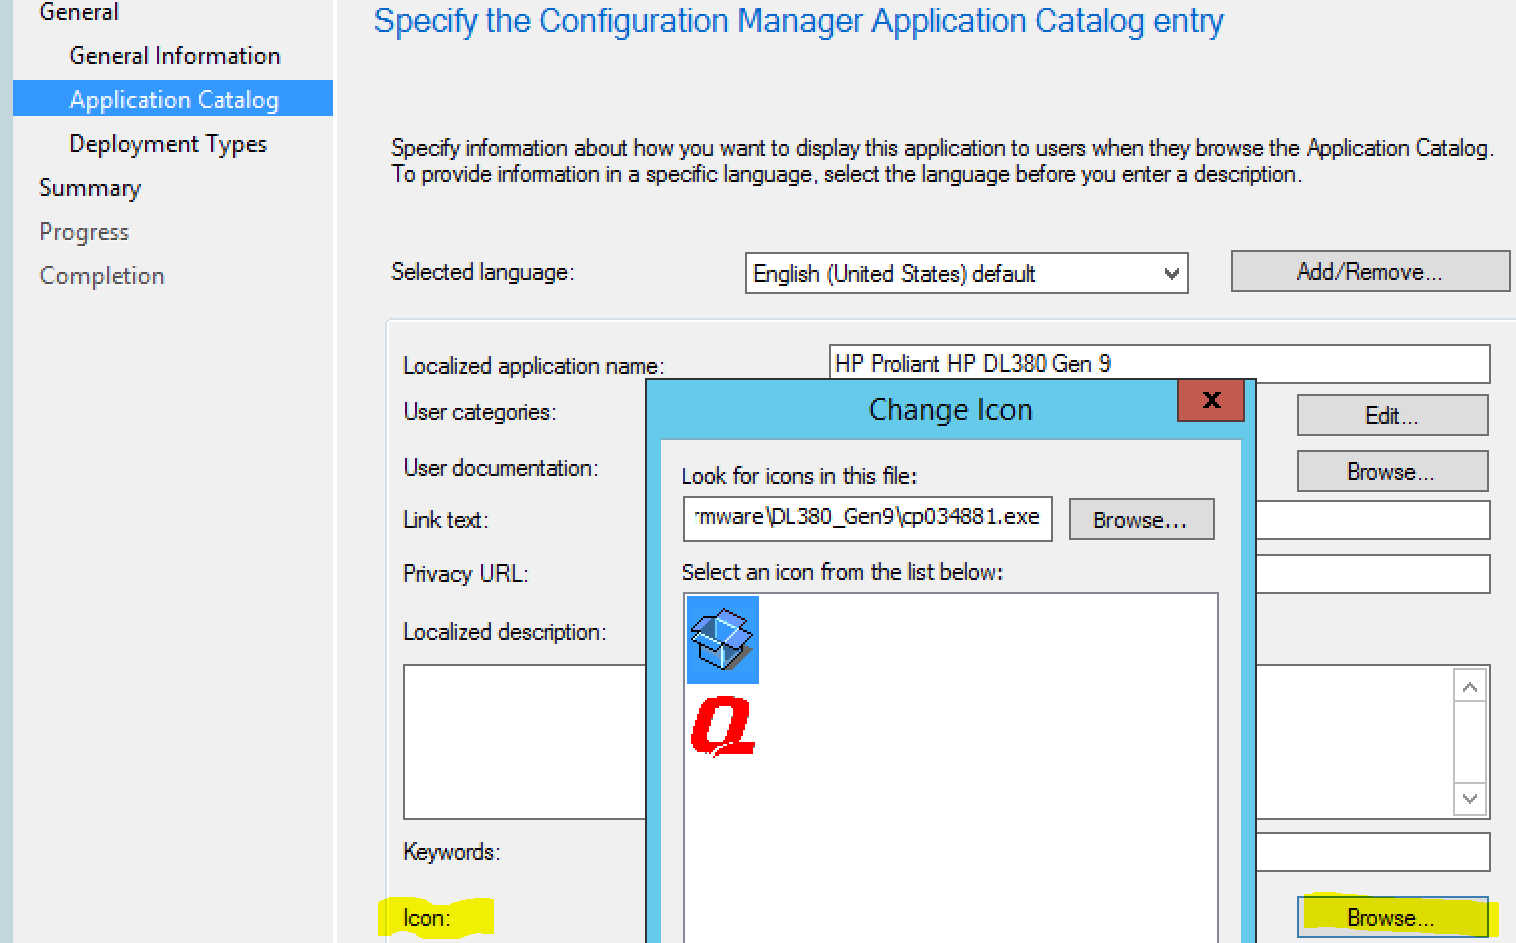
Enter Application Catalog information, choose icon, and specify documentiaton if you want to:
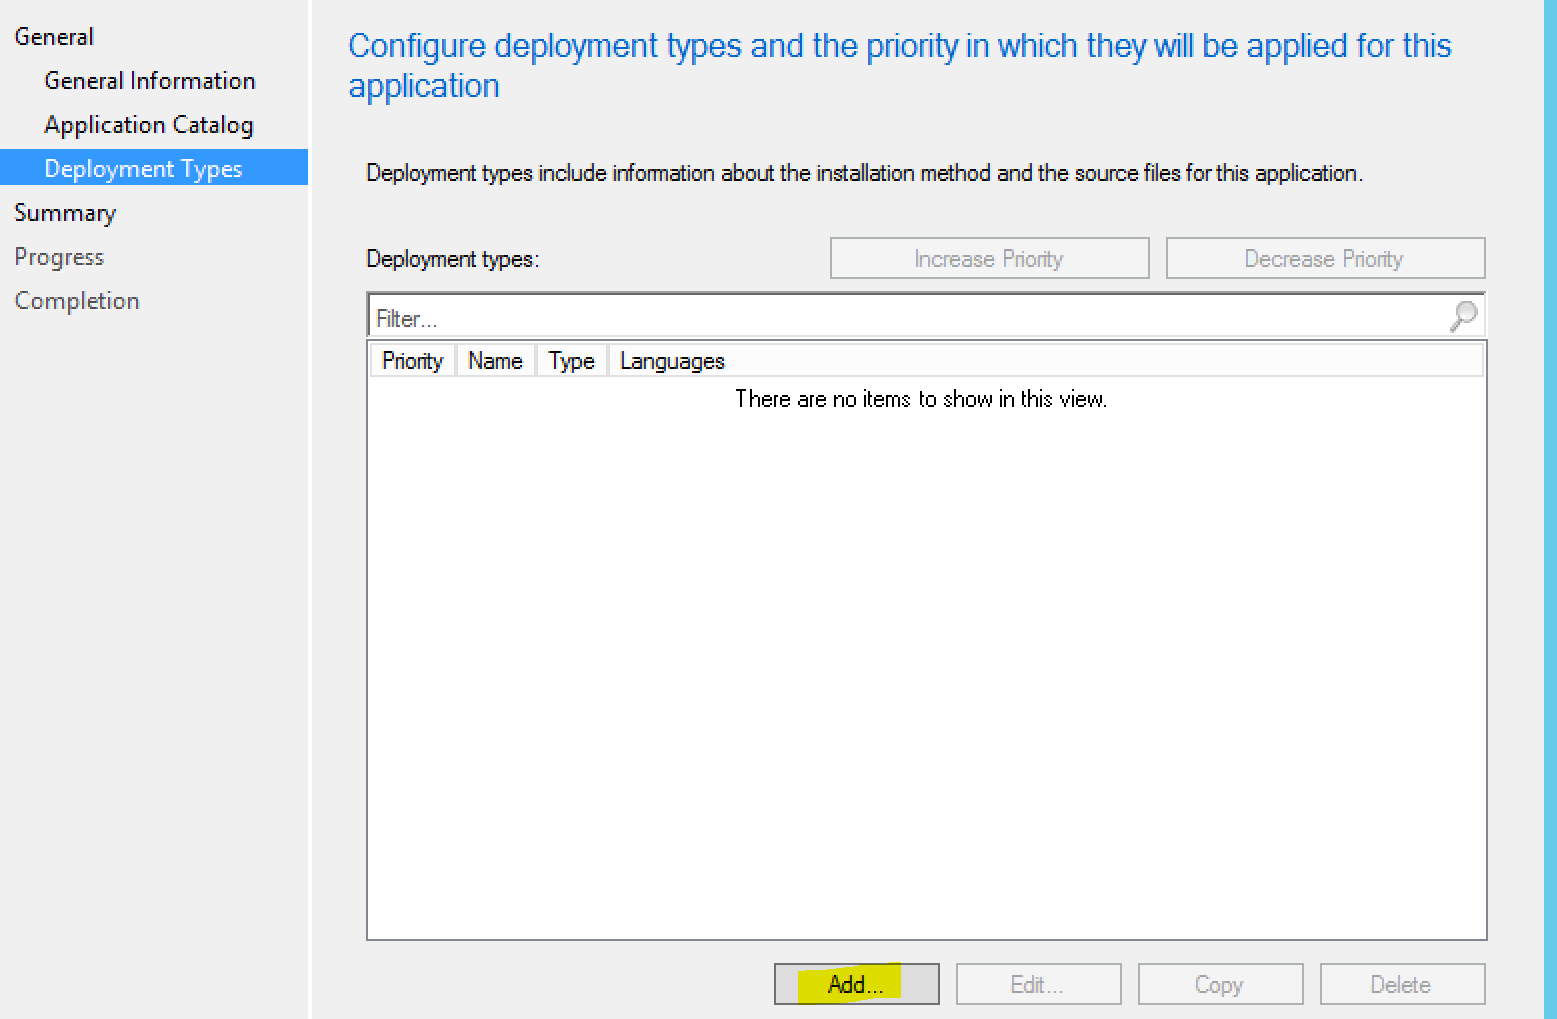
Add the deployment type:
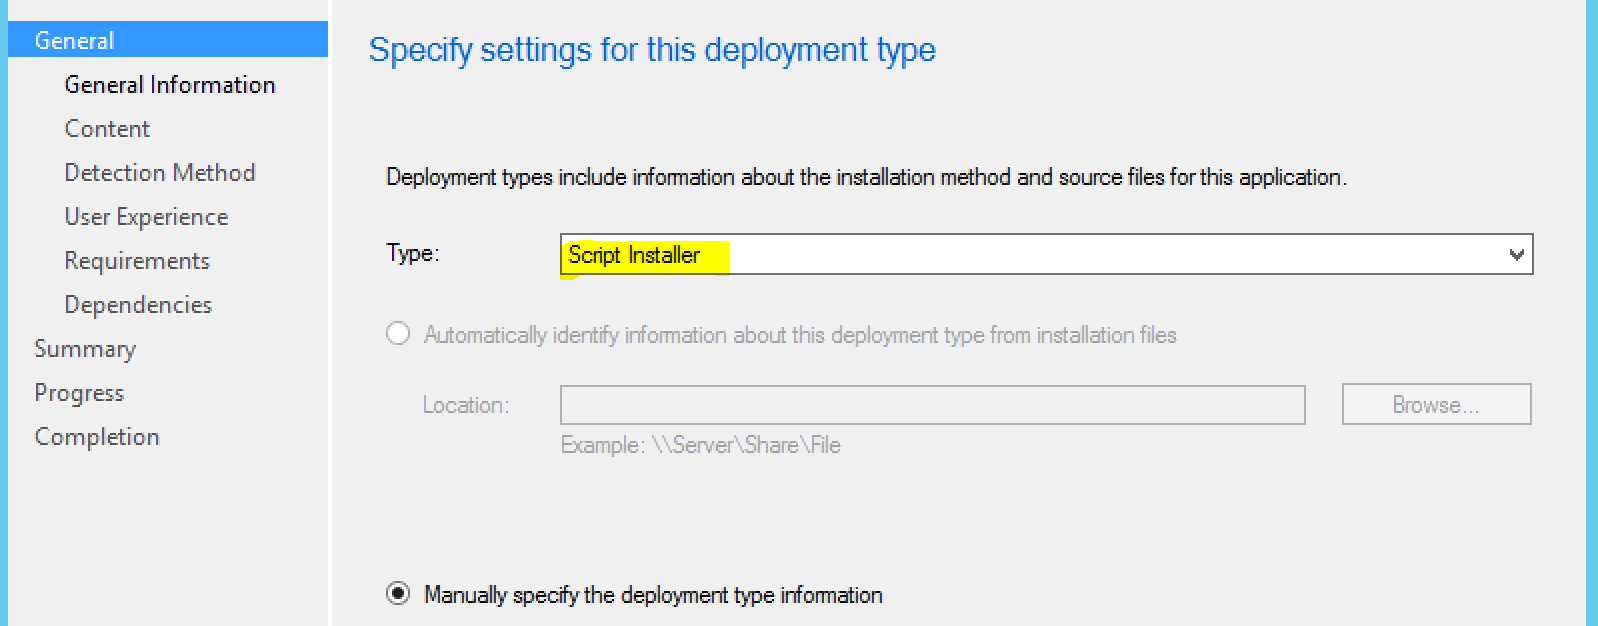
Choose “Script Installer”:
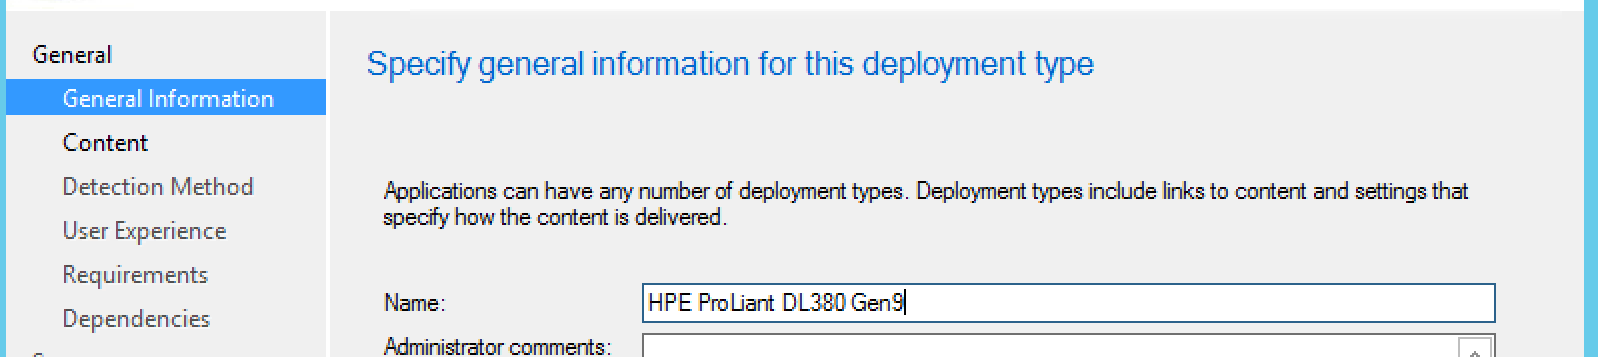
Enter General Information:
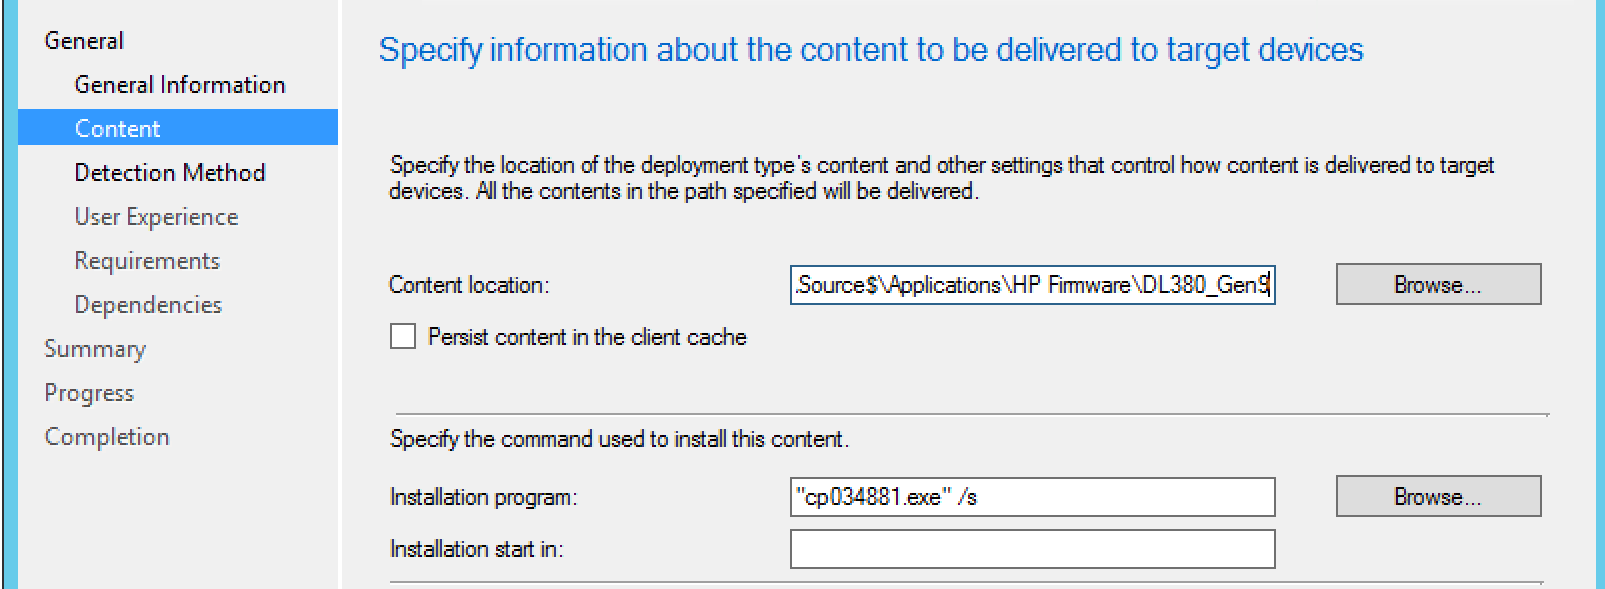
Here we are going to use the switches we determined earlier, in this case, the /s for silent install. Of course, we’ll specify the content location as well.
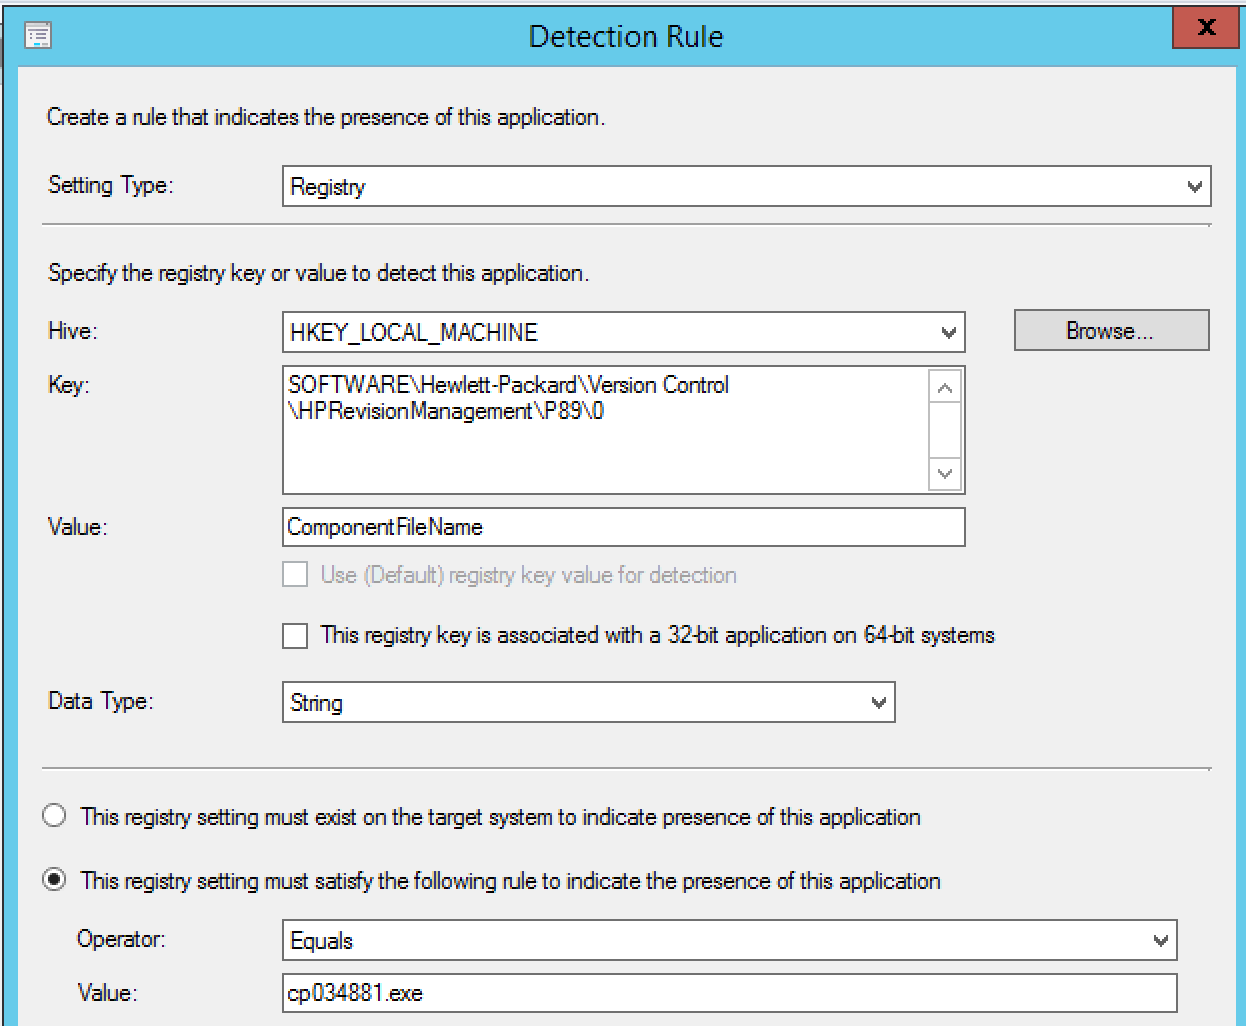
Now, we’re going to enter our detection method. This will be what we target to see if the installation was successful.
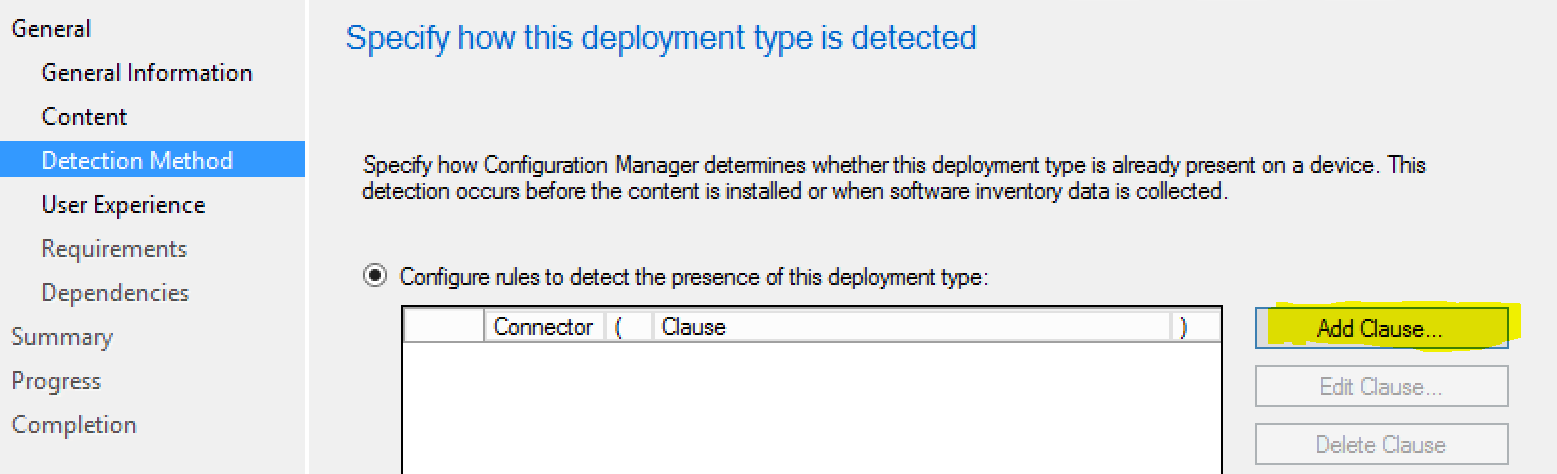
In testing, we noticed the following registry key was something we could specify as the detection:
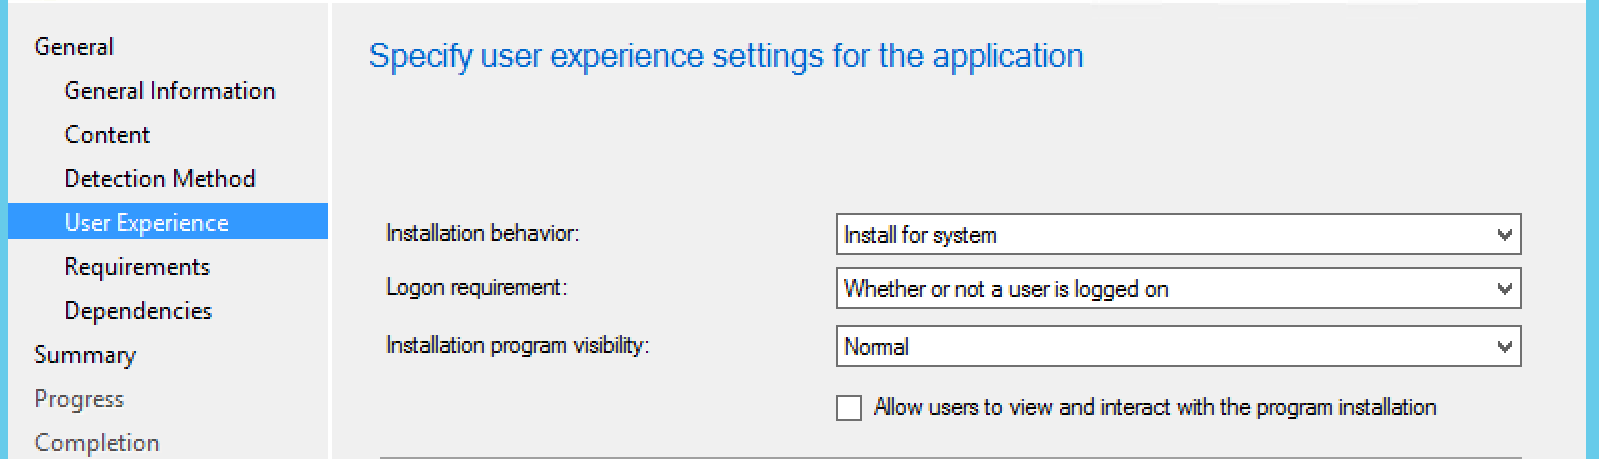
User experience settings, specify this to “Install for system”, and Logon requirement to “Whether or not a user is logged on”, then next:
After the User Experience, you can click next through to the summary as that’s all we’re focused on for now.
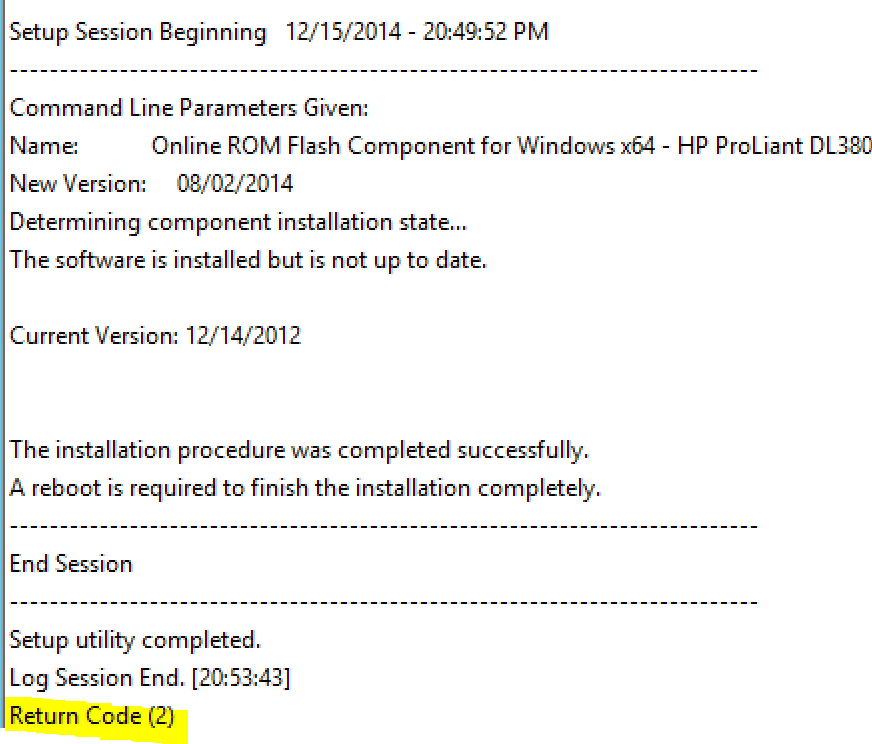
In testing, we noticed that it was reporting that the applicaton failed, which didn’t quite make sense because it was such a basic install. So we dug a little bit and found the HP log that get’s created in the root of C:\, named <installer>.log (example: cp034881.log). This log told us otherwise:
The nice about creating applications is that we can add Return Codes to the application. In Software Library, choose the Deployment Types tab on the bottom from the firware application you created. Open the properties for the installer.

Here we can see the built-in codes don’t align with what the HP installer returns.
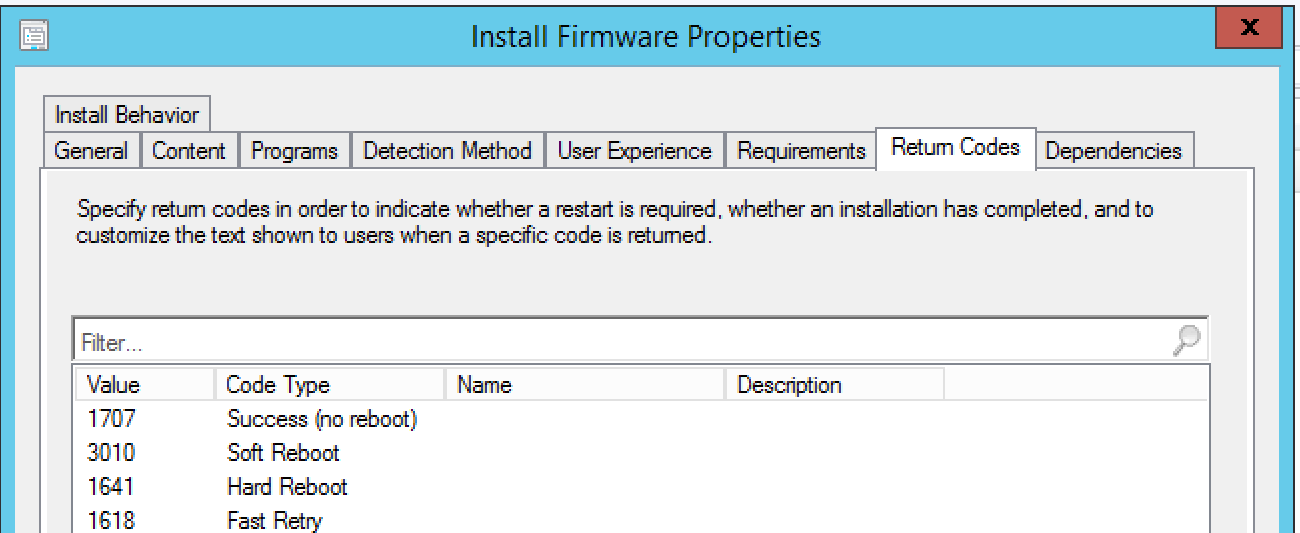
Click add at the bottom:
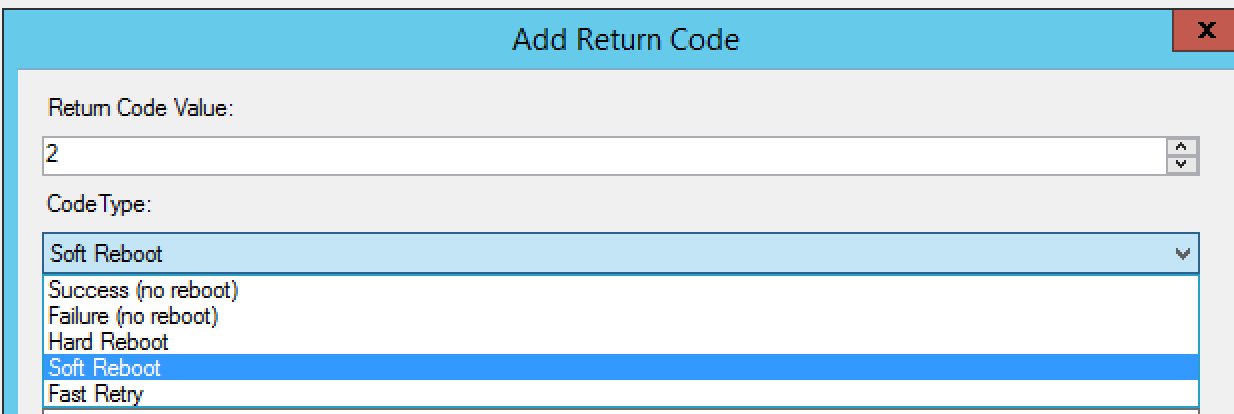
The default options aren’t that great, so set it to what you feel works best. In this, I used the following:

We reached out to the HPE rep and he provided us an old document that gave us the Windows smart component return codes.
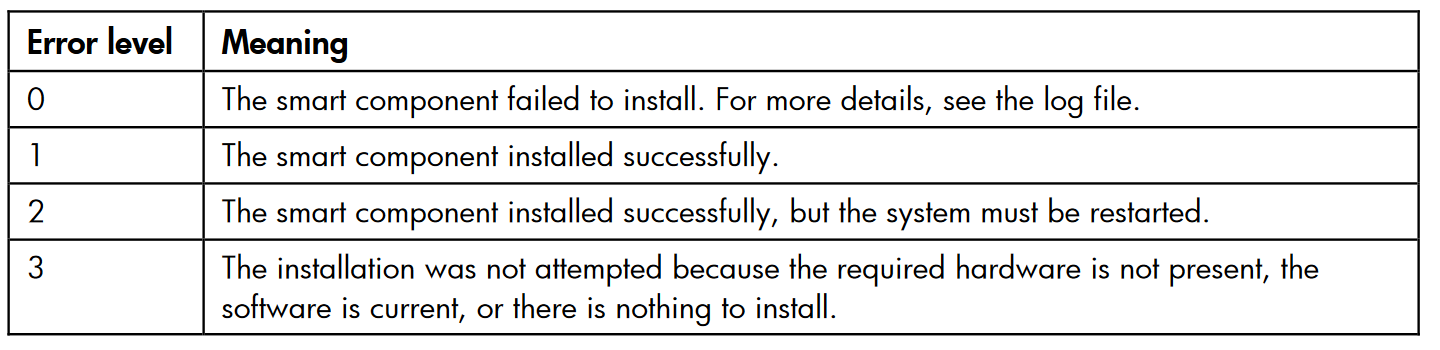
Source:
https://support.hpe.com/hpsc/doc/public/display?docId=emr_na-c02511658#page=73&zoom=auto,-79,574
Step 2 – Understanding levels of protection

To break this down line by line, I will add the explanation and corelating fix:
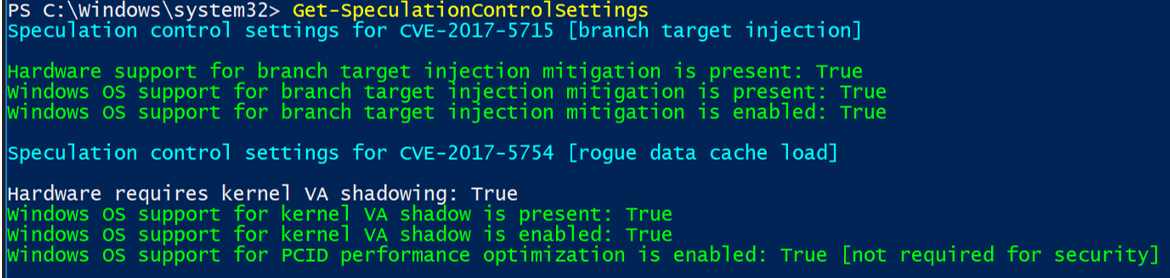
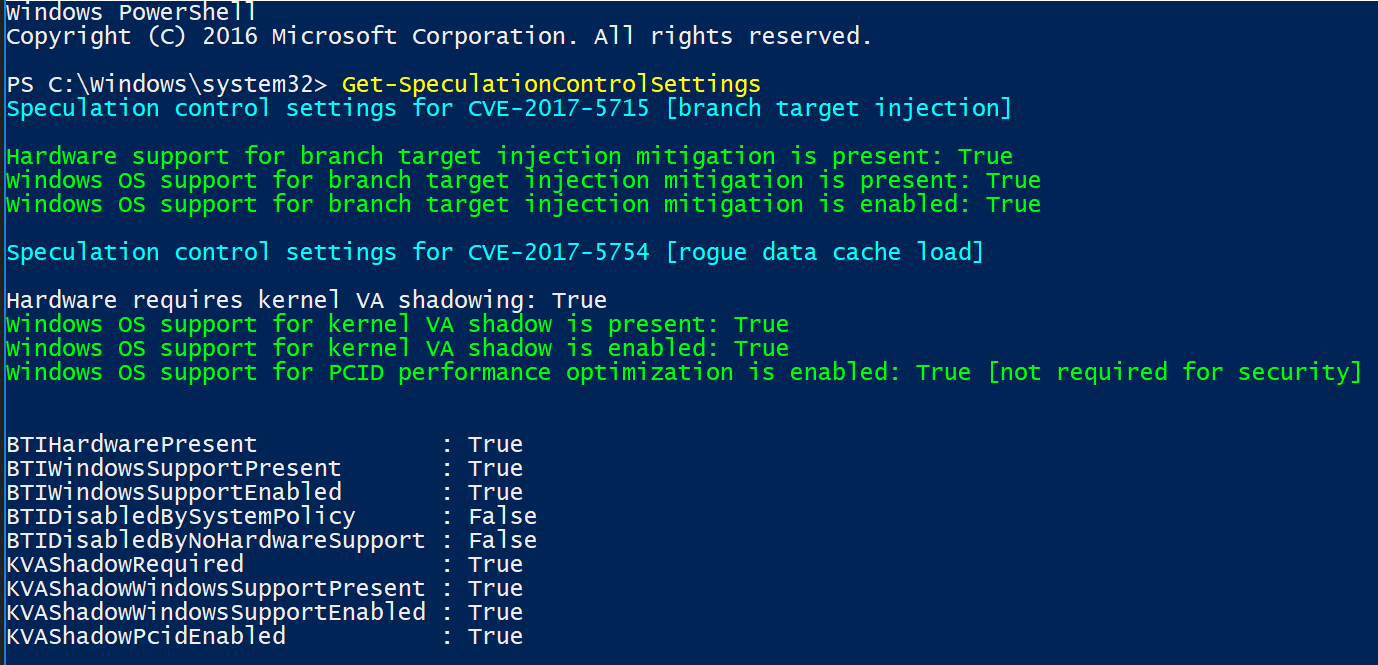
Hardware support for branch target injection mitigation is present: True (Firmware related)
- Maps to BTIHardwarePresent. This line tells you if hardware features are present to support the branch target injection mitigation. The device OEM is responsible for providing the updated BIOS/firmware that contains the microcode provided by CPU manufacturers. If this line is True, the required hardware features are present. If the line is False (update firmware), the required hardware features are not present, and therefore the branch target injection mitigation cannot be enabled.
Windows OS support for branch target injection mitigation is present: True (Current CU Related)
- Maps to BTIWindowsSupportPresent. This line tells you if Windows operating system support is present for the branch target injection mitigation. If it is True, the operating system supports enabling the branch target injection mitigation (and therefore has installed the January 2018 update). If it is False, the January 2018 update has not been installed on the system, and the branch target injection mitigation cannot be enabled.
Windows OS support for branch target injection mitigation is enabled: True (OS Registry related)
- Maps to BTIWindowsSupportEnabled. This line tells you if Windows operating system support is enabled for the branch target injection mitigation. If it is True, hardware support and OS support for the branch target injection mitigation is enabled for the device, thus protecting against CVE-2017-5715. If it is False, one of the following conditions is the true:
- Hardware support is not present.
- OS support is not present.
- The mitigation has been disabled by system policy.
Hardware requires kernel VA shadowing: True
- Maps to KVAShadowRequired. This line tells you if the hardware is vulnerable to CVE-2017-5754. If it is True, the hardware is believed to be vulnerable to CVE-2017-5754. If it is False, the hardware is known to not be vulnerable to CVE-2017-5754.
Windows OS support for kernel VA shadow is present: True (Current CU related)
- Maps to KVAShadowWindowsSupportPresent. This line tells you if Windows operating system support for the kernel VA shadow feature is present. If it is True, the January 2018 update is installed on the device, and kernel VA shadow is supported. If it is False, the January 2018 update is not installed, and kernel VA shadow support does not exist.
Windows OS support for kernel VA shadow is enabled: True (OS Registry related)
- Maps to KVAShadowWindowsSupportEnabled. This line tells you if the kernel VA shadow feature has been enabled. If it is True, the hardware is believed to be vulnerable to CVE-2017-5754, Windows operating system support is present, and the feature has been enabled. The Kernel VA shadow feature is currently enabled by default on client versions of Windows and is disabled by default on versions of Windows Server. If it is False, either Windows operating system support is not present, or the feature has not been enabled.
Windows OS support for PCID performance optimization is enabled: True [not required for security]
- Maps to KVAShadowPcidEnabled. This line tells you if an additional performance optimization has been enabled for kernel VA shadow. If it is True, kernel VA shadow is enabled, hardware support for PCID is present, and PCID optimization for kernel VA shadow has been enabled. If it is False, either the hardware or the OS may not support PCID. It is not a security weakness for the PCID optimization to not be enabled.
BTIHardwarePresent: True -> apply OEM BIOS/firmware update
BTIWindowsSupportPresent: True -> install January 2018 update
BTIWindowsSupportEnabled: True -> on client, no action required. On server, follow guidance.
BTIDisabledBySystemPolicy: False -> ensure not disabled by policy.
BTIDisabledByNoHardwareSupport: False -> ensure OEM BIOS/firmware update is applied.
KVAShadowRequired: True or False -> no action, it’s a function of the CPU the machine uses
If KVAShadowRequired is TRUE
KVAShadowWindowsSupportPresent: True -> install January 2018 update
KVAShadowWindowsSupportEnabled: True -> on client, no action required. On server, follow guidance.
KVAShadowPcidEnabled: True or False -> no action, it’s a function of the CPU the machine uses
PART 1 – Deploy the Spectre-Meltdown Fix via SCCM
This article will cover the process of addressing the Spectre and Meltdown vulnerability using Configuration Manager for Task Sequence deployment coupled with a Configuration Baseline for compliance reporting.
Contents
Step 1 – Import & Deploy Configuration Baseline
Step 2 – Package and Deploy the registry keys and Meltdown-Spectre patches via Task Sequence
Step 3 – Deploy firmware update (Add to Task Sequence – Optional)
Step 4 – Understanding levels of protection
Firmware vendor list
Article Sources
Step 1 – Import & Deploy Configuration Baseline
The official baseline release can be found here.
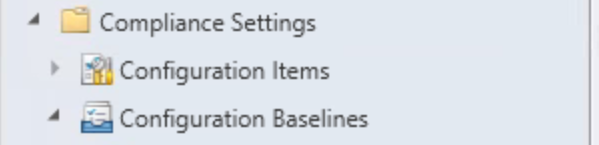
Starting in the SCCM console, Assets and Compliance > Compliance Settings > Configuration Baselines
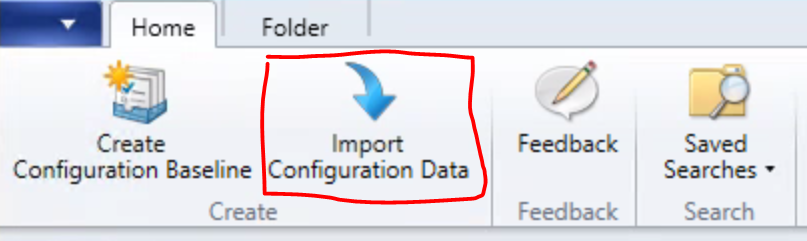
 Choose Import Configuration Data:
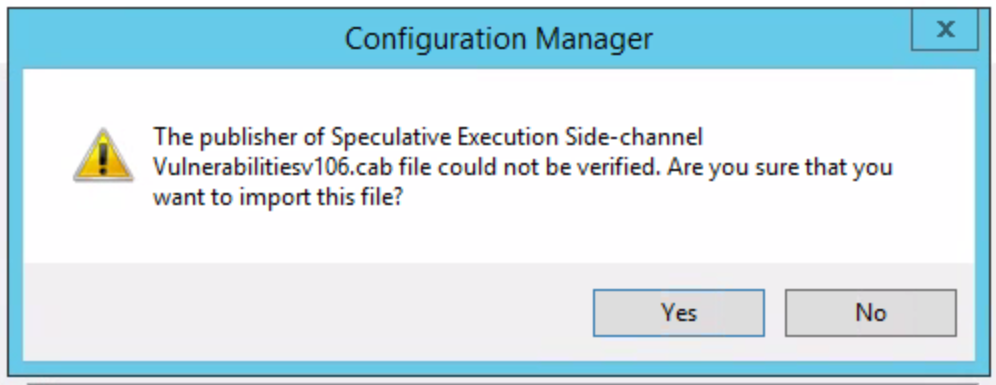
 Click “Add” and choose the “Speculative Execution Side-channel Vulnerabilitiesv106.cab” downloaded from the link provided in the article above. You’ll notice the following error, assuming that’s ok with you, choose “Yes” and continue.
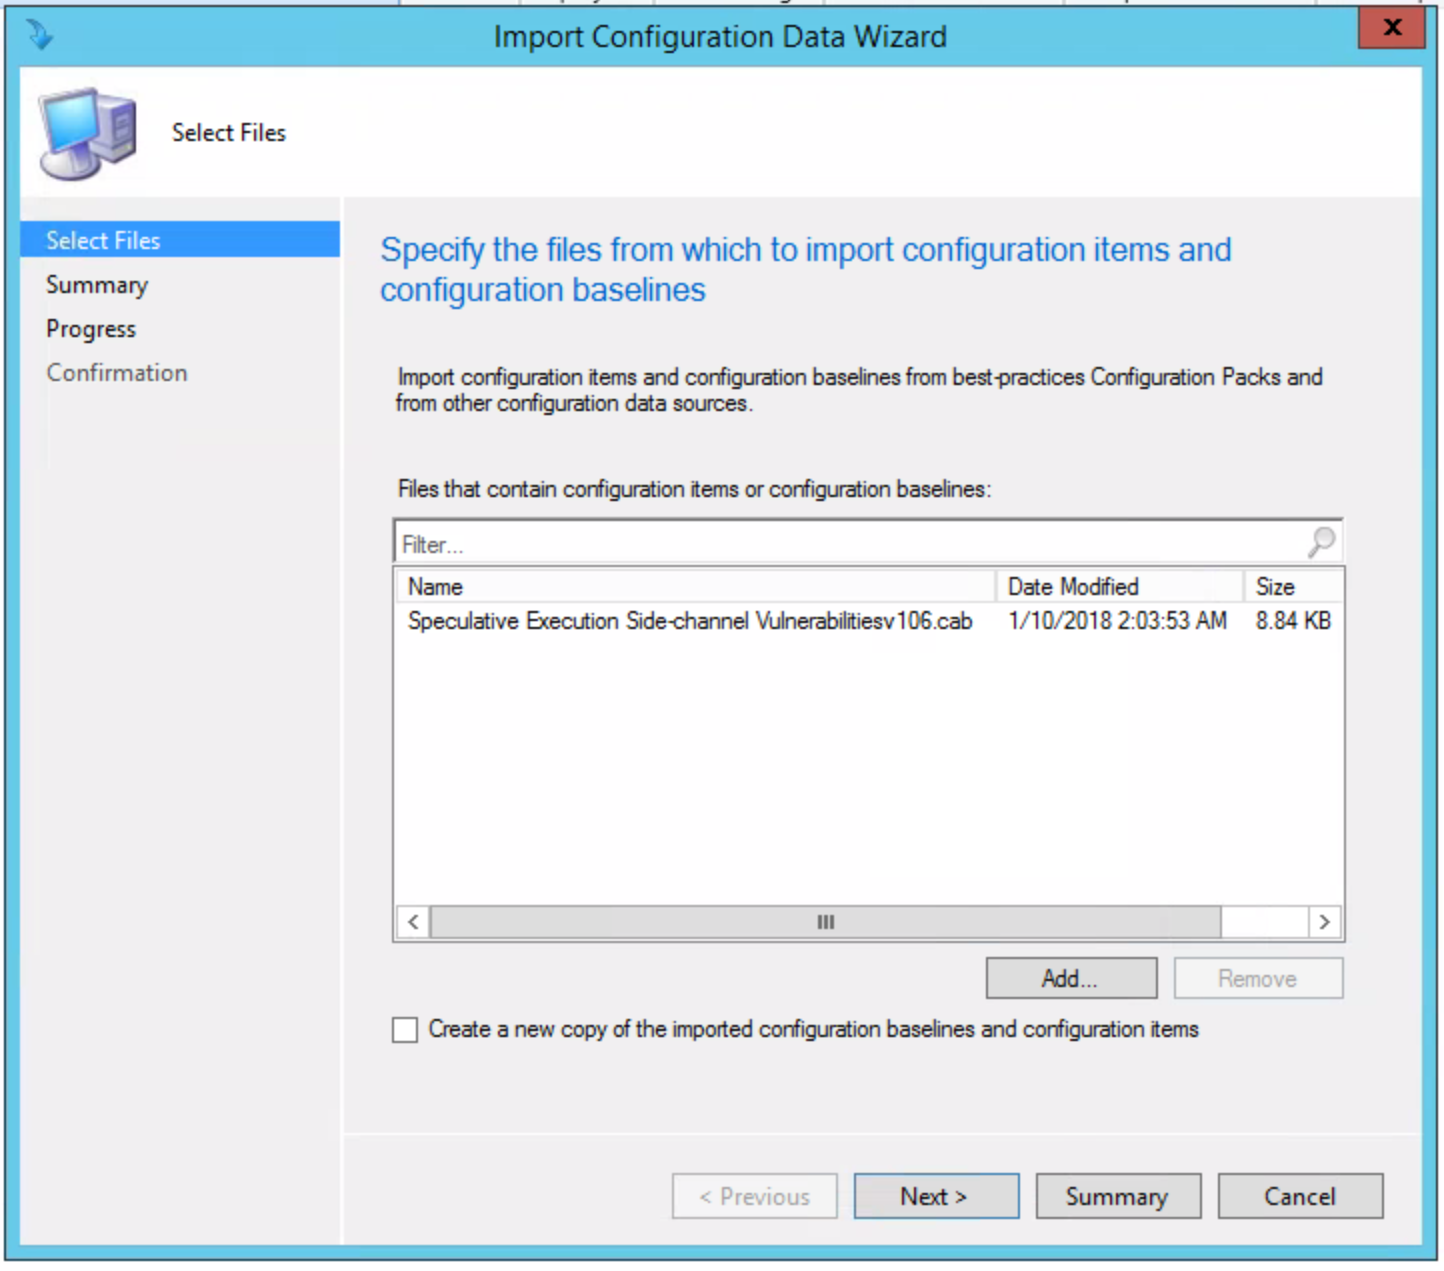 Once added, choose “Next” and you’ll see the following, click “Next” and continue:
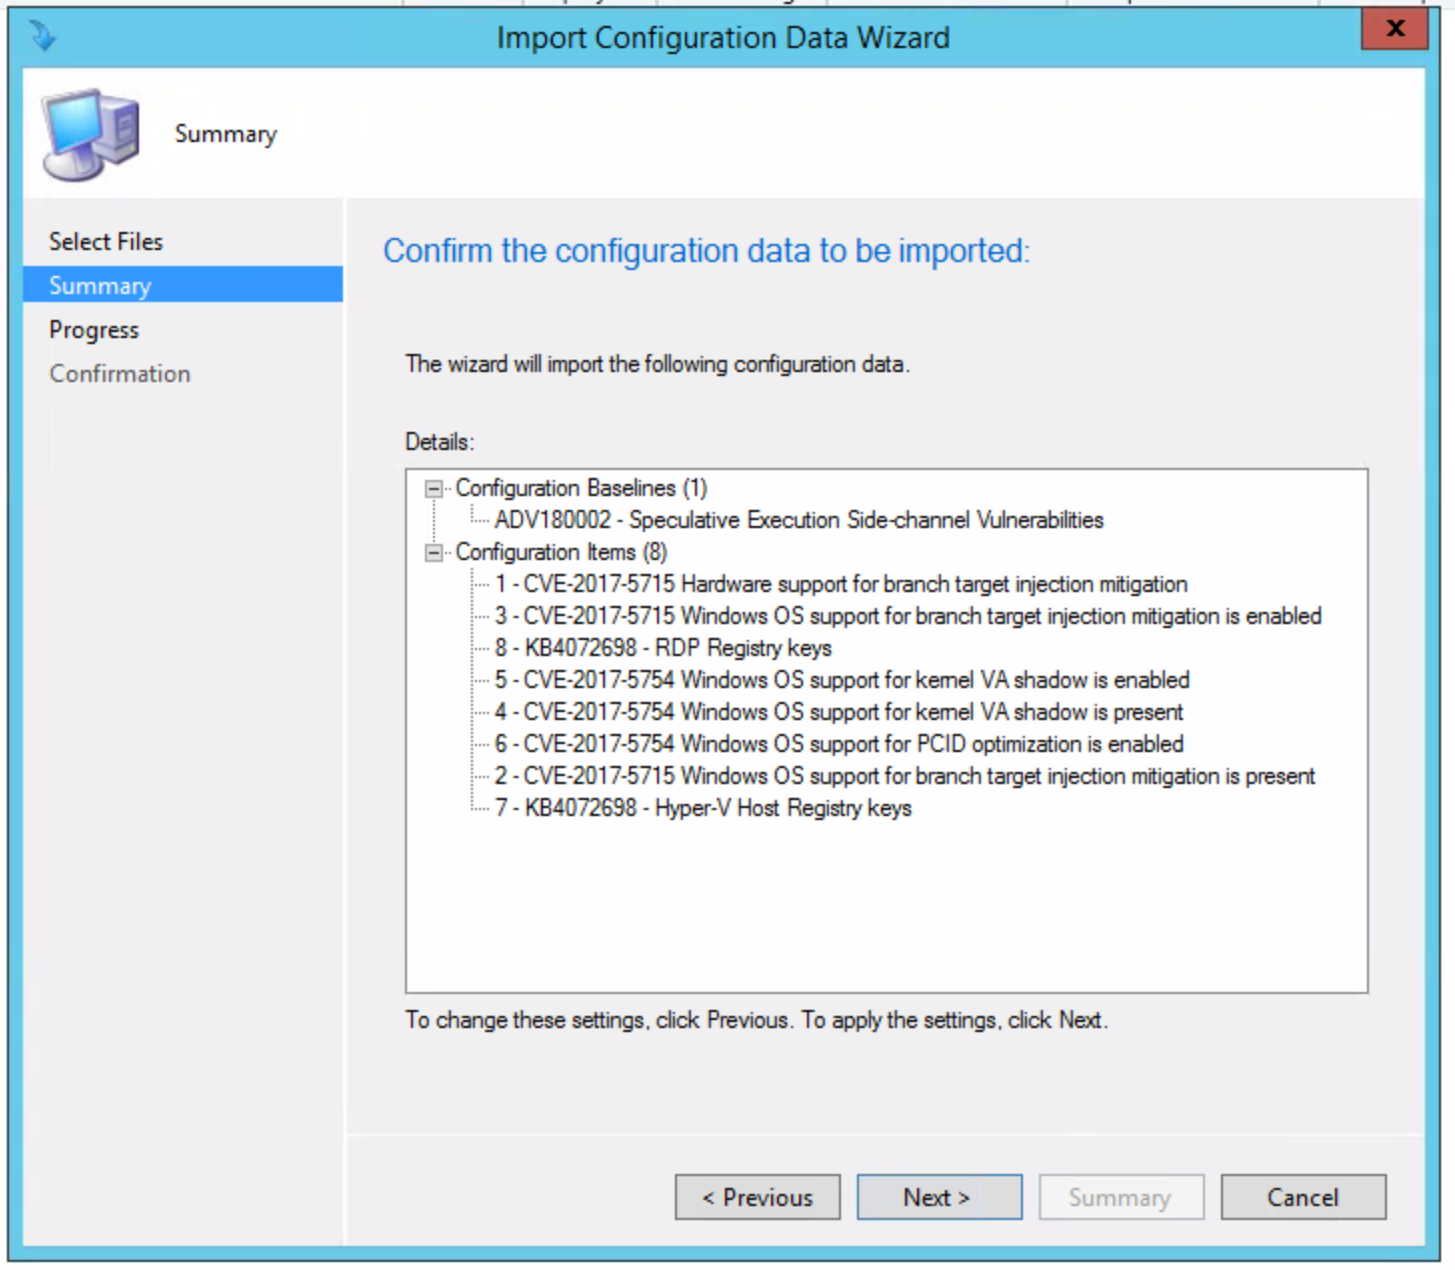 Once complete, you’ll see the following:
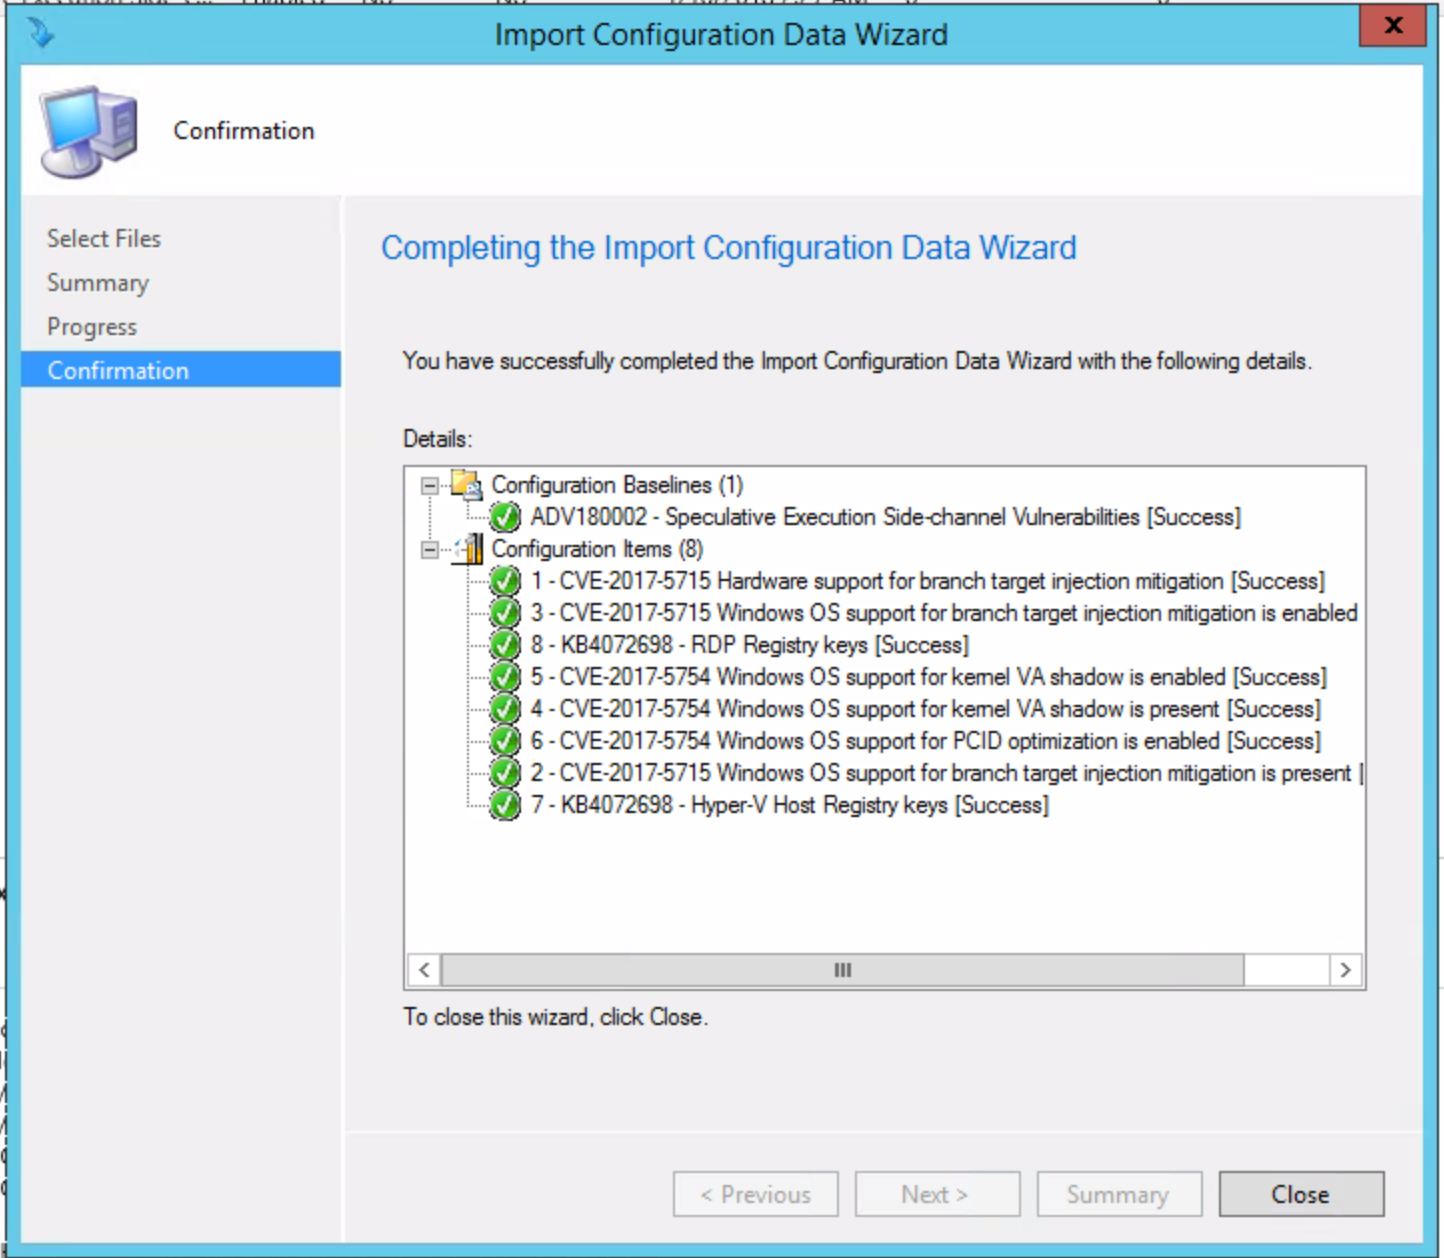 Close the Import Configuration Data Wizard once it finishes. You’ll now see the following under Configuration Baselines in the folder where you Imported it.
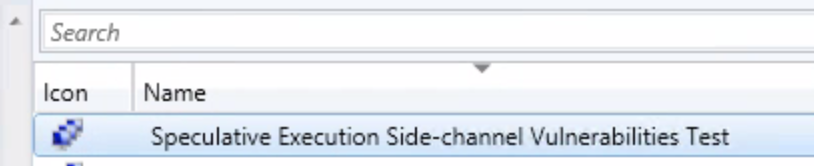
 Since we are testing this first, I went ahead and created a test collection where I will deploy the Configuration Baseline. *Please test before you deploy to production*
 Now that we have the Configuration Baseline added, our test collection created, we can deploy the Baseline. Head back to Assets and Compliance > Compliance Settings > Configuration Baselines, right click on the newly created Baseline and choose “Deploy”. Or choose from the ribbon.
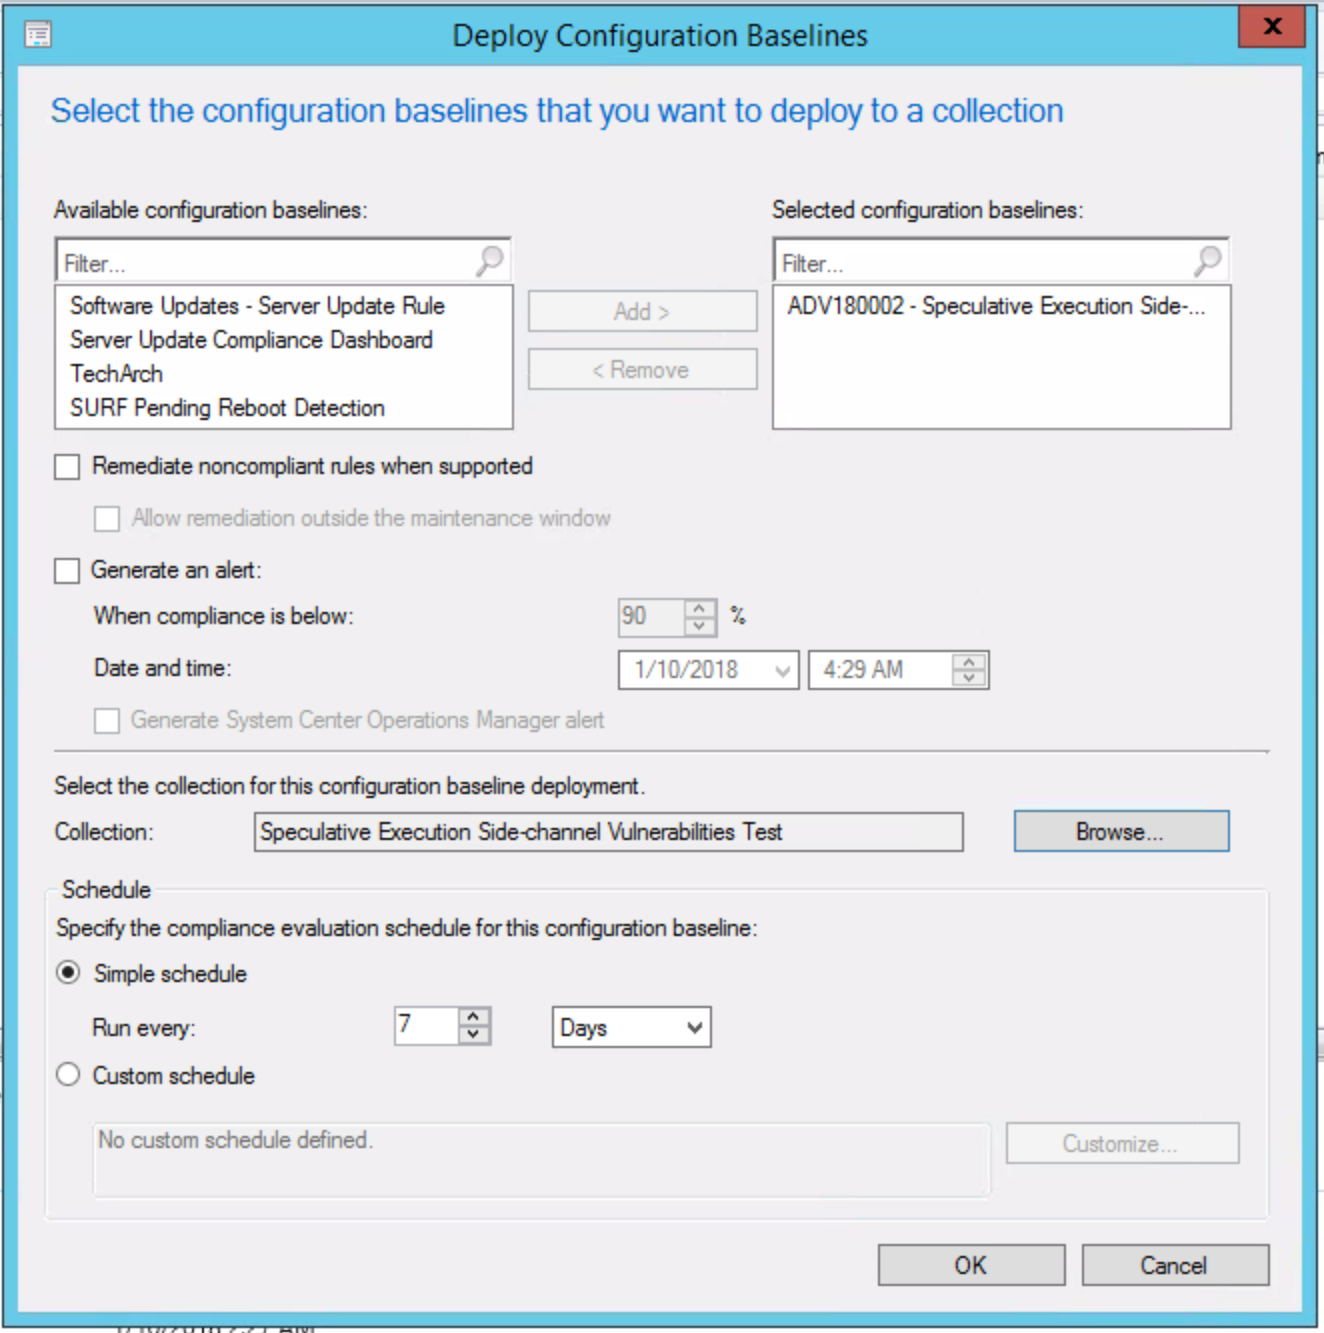 From deployment wizard, we have the option to check “Remediate noncompliant rules when supported” which will automatically remediate the registry entries, however, we will opt to deploy the registry changes via a task sequence and use this baseline for reporting only. Choosing this would automate the remediation within your maintenance windows, otherwise checking “Allow remediation outside the maintenance window” would allow for remediation sooner.
We should see the following on the deployments tab once the Baseline is deployed:
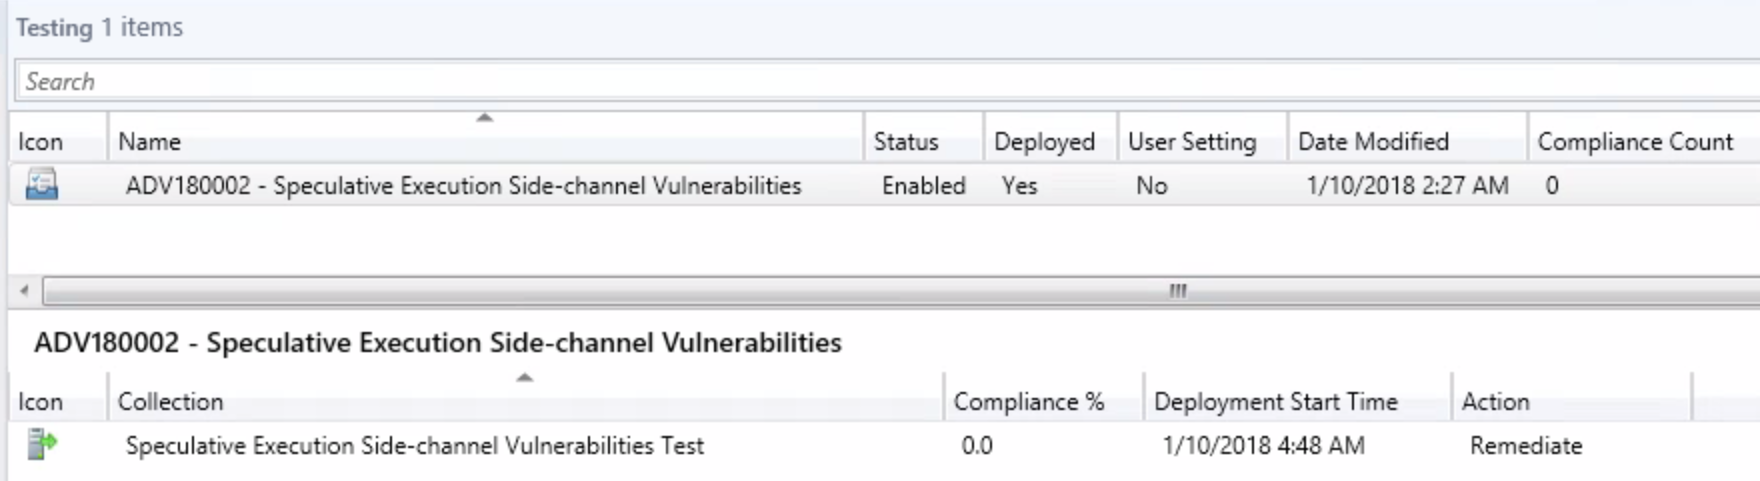
 Step 2 – Package and Deploy the registry keys and Meltdown-Spectre patches via Task Sequence
The first part of the Task Sequence will be a “Check Readiness” to ensure the disk has at least 2GB free space and that there is an eligible OS installed.
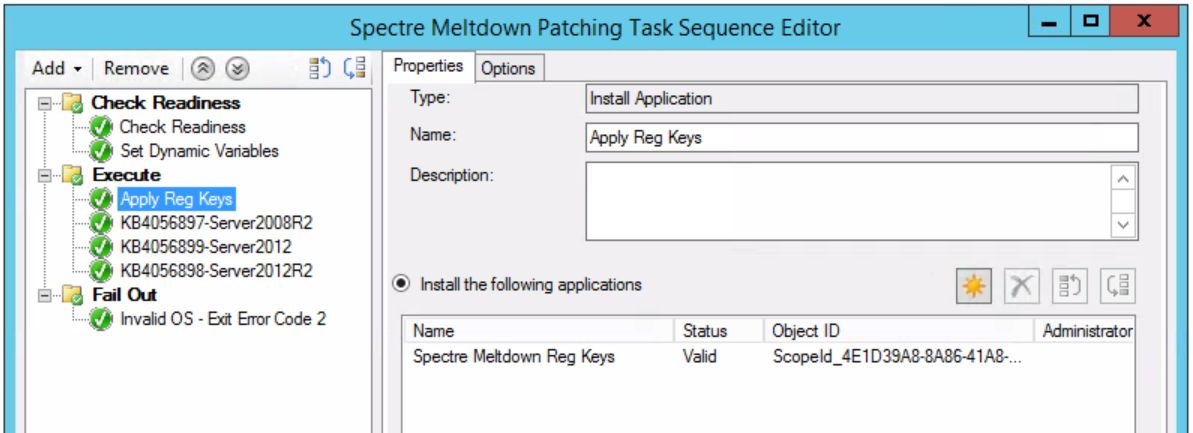
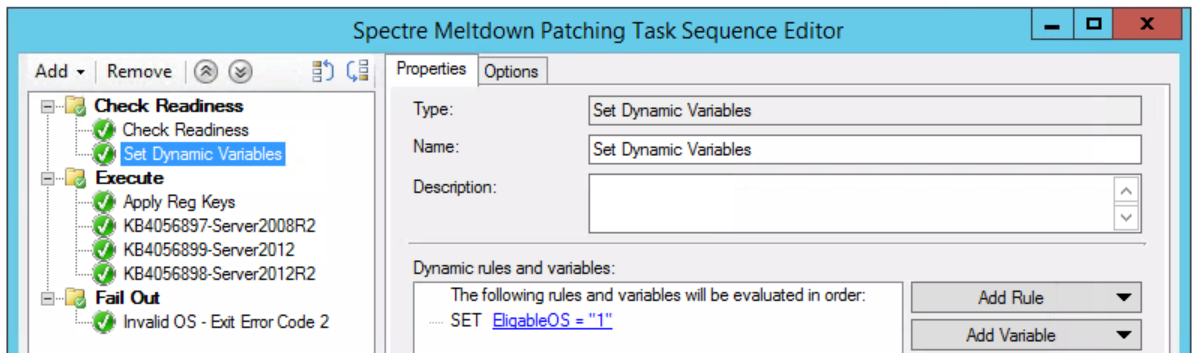 Package the following registry keys and add to the task sequence under the second step, “Execute” (a simple .BAT or .CMD will do just fine):
reg add “HKEY_LOCAL_MACHINESYSTEMCurrentControlSetControlSession ManagerMemory Management” /v FeatureSettingsOverride /t REG_DWORD /d 0 /f
reg add “HKEY_LOCAL_MACHINESYSTEMCurrentControlSetControlSession ManagerMemory Management” /v FeatureSettingsOverrideMask /t REG_DWORD /d 3 /f
reg add “HKLMSOFTWAREMicrosoftWindows NTCurrentVersionVirtualization” /v MinVmVersionForCpuBasedMitigations /t REG_SZ /d “1.0” /f
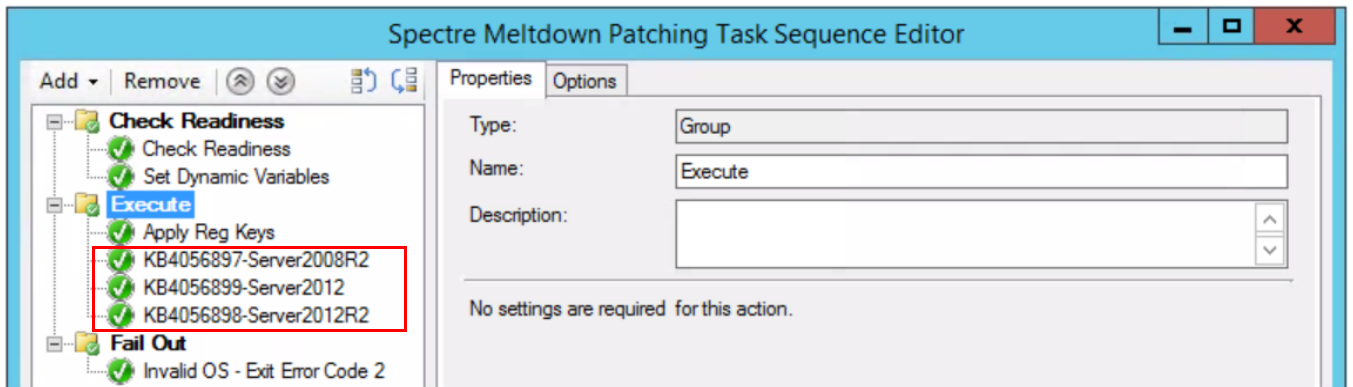
 Download and package the following updates and include in the task sequence after “Apply Reg Keys” in the “Execute” portion as shown below:

 After you’ve deployed everything, head over reporting and look at “Compliance and Settings Management”. Depending on how you want to view compliance, there is an assortment of built in reports that should show you what you want to see.
 Step 3 – Deploy firmware update (Add to Task Sequence – Optional)
Visit the Firmware vendor list and find the vendor for which you need the firmware for. Once you’ve tested the firmware in your environment, package it up and add that to the task sequence as the last step.
Step 5 – Understanding levels of protection
 To break this down line by line, I will add the explanation and corelating fix:
Hardware support for branch target injection mitigation is present: True (Firmware related)
- Maps to BTIHardwarePresent. This line tells you if hardware features are present to support the branch target injection mitigation. The device OEM is responsible for providing the updated BIOS/firmware that contains the microcode provided by CPU manufacturers. If this line is True, the required hardware features are present. If the line is False (update firmware), the required hardware features are not present, and therefore the branch target injection mitigation cannot be enabled.
Windows OS support for branch target injection mitigation is present: True (January patch related)
- Maps to BTIWindowsSupportPresent. This line tells you if Windows operating system support is present for the branch target injection mitigation. If it is True, the operating system supports enabling the branch target injection mitigation (and therefore has installed the January 2018 update). If it is False, the January 2018 update has not been installed on the system, and the branch target injection mitigation cannot be enabled.
Windows OS support for branch target injection mitigation is enabled: True (OS Registry related)
- Maps to BTIWindowsSupportEnabled. This line tells you if Windows operating system support is enabled for the branch target injection mitigation. If it is True, hardware support and OS support for the branch target injection mitigation is enabled for the device, thus protecting against CVE-2017-5715. If it is False, one of the following conditions is the true:
- Hardware support is not present.
- OS support is not present.
- The mitigation has been disabled by system policy.
Hardware requires kernel VA shadowing: True
- Maps to KVAShadowRequired. This line tells you if the hardware is vulnerable to CVE-2017-5754. If it is True, the hardware is believed to be vulnerable to CVE-2017-5754. If it is False, the hardware is known to not be vulnerable to CVE-2017-5754.
Windows OS support for kernel VA shadow is present: True (January patch related)
- Maps to KVAShadowWindowsSupportPresent. This line tells you if Windows operating system support for the kernel VA shadow feature is present. If it is True, the January 2018 update is installed on the device, and kernel VA shadow is supported. If it is False, the January 2018 update is not installed, and kernel VA shadow support does not exist.
Windows OS support for kernel VA shadow is enabled: True (OS Registry related)
- Maps to KVAShadowWindowsSupportEnabled. This line tells you if the kernel VA shadow feature has been enabled. If it is True, the hardware is believed to be vulnerable to CVE-2017-5754, Windows operating system support is present, and the feature has been enabled. The Kernel VA shadow feature is currently enabled by default on client versions of Windows and is disabled by default on versions of Windows Server. If it is False, either Windows operating system support is not present, or the feature has not been enabled.
Windows OS support for PCID performance optimization is enabled: True [not required for security]
- Maps to KVAShadowPcidEnabled. This line tells you if an additional performance optimization has been enabled for kernel VA shadow. If it is True, kernel VA shadow is enabled, hardware support for PCID is present, and PCID optimization for kernel VA shadow has been enabled. If it is False, either the hardware or the OS may not support PCID. It is not a security weakness for the PCID optimization to not be enabled.
BTIHardwarePresent: True -> apply OEM BIOS/firmware update
BTIWindowsSupportPresent: True -> install January 2018 update
BTIWindowsSupportEnabled: True -> on client, no action required. On server, follow guidance.
BTIDisabledBySystemPolicy: False -> ensure not disabled by policy.
BTIDisabledByNoHardwareSupport: False -> ensure OEM BIOS/firmware update is applied.
KVAShadowRequired: True or False -> no action, it’s a function of the CPU the machine uses
If KVAShadowRequired is TRUE
KVAShadowWindowsSupportPresent: True -> install January 2018 update
KVAShadowWindowsSupportEnabled: True -> on client, no action required. On server, follow guidance.
KVAShadowPcidEnabled: True or False -> no action, it’s a function of the CPU the machine uses
Firmware vendor list:
https://www.intel.com/content/www/us/en/support/articles/000025619/software.html
Guidance to mitigate speculative execution side-channel vulnerabilities – https://portal.msrc.microsoft.com/en-US/security-guidance/advisory/ADV180002
Additional guidance to mitigate speculative execution side-channel vulnerabilities – https://blogs.technet.microsoft.com/configurationmgr/2018/01/08/additional-guidance-to-mitigate-speculative-execution-side-channel-vulnerabilities/
Windows Server guidance to protect against speculative execution side-channel vulnerabilities – https://support.microsoft.com/en-us/help/4072698/windows-server-guidance-to-protect-against-the-speculative-execution
The ConfigMgr Speculation Control Baseline – https://gallery.technet.microsoft.com/Speculation-Execution-Side-1483f621
Official Baseline – https://gallery.technet.microsoft.com/Speculation-Execution-Side-1483f621
Deploying Configuration Baselines – https://docs.microsoft.com/en-us/sccm/compliance/deploy-use/deploy-configuration-baselines
Understanding Get-SpeculationControlSettings – https://support.microsoft.com/en-ie/help/4074629/understanding-the-output-of-get-speculationcontrolsettings-powershell