Good day everyone! Recently I spoke at Microsoft Tech Talk - Dallas on this topic, and I wanted to put together a quick informative post on some of the prerequisite steps along with implementation steps necessary to deploy the SCCM Cloud Management Gateway! This is an amazing feature that is truly a new way to manage your internet clients in your enterprise.
Certificate verification
Create:
- SCCM IIS Certificate
- SCCM Client Certificate
- SCCM CMG Certificate (same as IIS cert, but private key is exportable)
- SCCM OSD Certificate (same as client auth, but exportable)
Request:
- On Primary Site Request Client, IIS, OSD, and CMG certificates.
- SCCM IIS Cert Request (common name in request) short and FQDN
- SCCM OSD Cert Request (common name in request) short and FQDN
- SCCM CMG Cert request Unique (common name) must be specified when requesting SCCM CMG Certificate (example: cloudapp.net)
- GPO for autoenrollment for client certificates
Export:
- Root Cert to file
- Intermediate Cert to file (if present)
- SCCM CMG Certificate with password
- SCCM OSD Certificate with password
Azure Subscription & Permissions
- Login to portal.azure.com – identify subscription, verify permissions. We prefer this is done via a service account, however that service account needs to have temporary subscription ownership for us to continue.
PKI SCCM Changes and log verification process
- MP – IIS and console (mpsetup.log, mpcontrol.log)
- SUP – IIS and console (wcm.log) please refer to SSL in WSUS and SUP
- DP (workstation cert (SCCM OSD Certificate) in console)
- Site and Hierarchy Settings (HTTP or HTTPS, deselect CRL, use PKI when available)
Azure services wizard in console
Detailed steps:
As with most configurations for SCCM, we are going to start in the ConfigMan console.
- In the ConfigMgr Console, go to Administration > Cloud Services > Azure Services.
- Click Configure Azure Services on the ribbon menu.
- Select Cloud Management in the Wizard.
- Provide a Name and click Next to proceed.
- Click on Browse to either Import an existing App or click Create to start with a fresh App.
- You need to Sign in with a Subscription Admin/Owner.
Follow the steps for both Web and Client App to proceed with the wizard.
Click Next, Enable Azure AD User discovery is not required for CMG and is optional if you'd like to check it and finish the wizard.
Azure app registration modifications
Within the Azure Portal, we need to navigate to App Registrations:
We will hopefully find both our Server and Client API Apps that we created in the previous SCCM Console Wizards like below:
Click each of the app registrations, and navigate to the settings option like below:
We need to then modify permissions so that we can continue on with the actual creation of the Cloud Management Gateway with no issues. Please modify like below (we will need to do this on both Client app and the Server app):
Cloud management gateway creation
- On the ConfigMgr Console, go to Administration > Cloud Services > Cloud Management Gateway
- Click Create Cloud Management Gateway on the ribbon menu and Sign In with Azure Subscription Admin account
- The subscription info and the Web App created in Section 3 will auto populate. Click Next to proceed.
- Click Browse to specify the SCCM CMG Certificate (same as IIS but with the exportable private key and password) This will auto populate the Service name.
- Choose your Azure Region
- Choose Create new under Resource Group.
- Add the Client Trusted Root Certificate from section 1.1
- If you have an intermediate CA, please complete the chain of trust, by “Add” again.
- Verify Client Certificate Revocation checkbox [Clear this only if you haven't published the CRL on internet.]
- Click Next to finish the Wizard.
The deployment in Azure begins -
CloudMgr.log will show the details of the CMG deployment. Below are a few key points of the process that we are looking for log-wise.
Resource Manager - Creating resource group cmgarm with location South Central US SMS_CLOUD_SERVICES_MANAGER 3/27/2018 6:02:27 PM 3140 (0x0C44)
Resource Manager - Resource group cmgarm created SMS_CLOUD_SERVICES_MANAGER 3/27/2018 6:02:28 PM 3140 (0x0C44)
Resource Manager - Creating cloud service cmgarm with deployment CreateCloudServiceba0f51cf-SMS_CLOUD_SERVICES_MANAGER 3/27/2018 6:02:28 PM 3140 (0x0C44)
Resource Manager - Creating storage service cmgarm with deployment CreateStorageService7cabb6ec-SMS_CLOUD_SERVICES_MANAGER 3/27/2018 6:02:45 PM 3140 (0x0C44)
Uploading file C:\Program Files\Microsoft Configuration Manager\inboxes\cloudmgr.box\CloudProxyService.cspkg to container deploymentcontainer with blob name cmgarm.cspkg in storage account cmgarm SMS_CLOUD_SERVICES_MANAGER 3/27/2018 6:08:44 PM 3140 (0x0C44)
Log in to the Azure Console to view the resources
Validate the status Ready from ConfigMgr console.
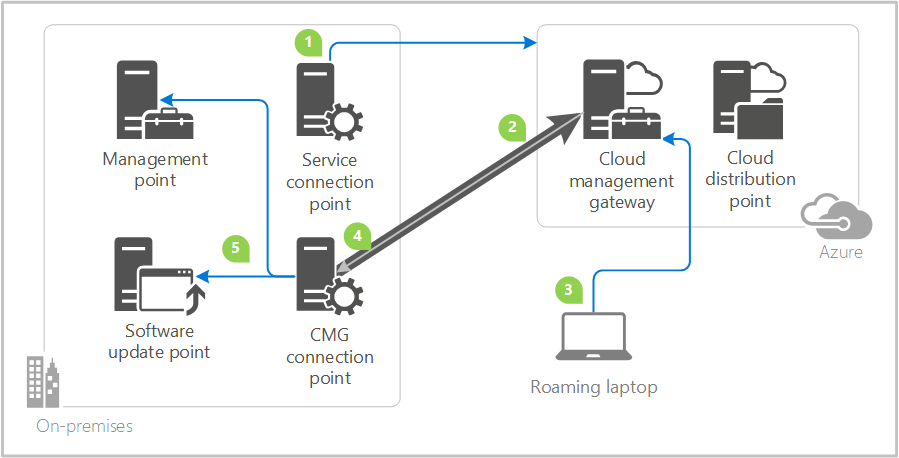
Cloud management gateway connector point creation
We must now go ahead and configure the Cloud Management Gateway Connector Point. You can think of this as a secure tunnel that’s connecting authenticated requests through your CMG, down to your on-premise hierarchy, specifically your management point and software update point(s)..
Steps:
- Add new site system role and choose Cloud Management Gateway connection point
- Validate the Gateway name we just created and the Region to finish the wizard.
The Connection Point server will show as associated in the console. For troubleshooting this component, you can check SMS_Cloud_ProxyConnector.log.
SUP and MP changes to accept CMG traffic
Within the console we must modify properties of the designated MP’s and SUP’s that your business organization has chosen to accept Cloud Management Gateway Traffic for your internet clients.
- On the Management Point Properties, check the box Allow Configuration Manager cloud management gateway traffic
- Follow the same steps for Software Update Point.
Ensure and enable content hosting on CMG (this is new to 1806+)
Starting with 1806, the product group modified the behavior and administration of cloud content. Historically you had to provision a Cloud Distribution Point for content, now all of that can be hosted on your CMG (go to properties of CMG):
Test functionality
We must modify our Default Client Settings, or the Client Settings deployed to our test collection of machines to ensure that we have CMG options enabled. Upon confirmation, we can either initiate a machine policy download, or simply restart the SMS Agent Host for quicker results.
The client machines will receive CMG connection info which can be verified by the following registry key – HKEY_LOCAL_MACHINE\SOFTWARE\Microsoft\SMS\Client\Internet Facing
On a test client outside corporate network, check CCMMessaging.log to validate a successful communication with CMG
Additional testing methods
You can force the client to always use the CMG regardless of whether it’s on the intranet or internet. This configuration is useful for testing purposes, or for clients at remote offices that you want to force to use the CMG. Set the following registry key on the client:
HKEY_LOCAL_MACHINE\SOFTWARE\Microsoft\CCM\Security, ClientAlwaysOnInternet = 1
Verify that the client is on Internet through the Configuration Manager applet in the control panel:
And run following PowerShell line to verify that the CMG is available as Internet management point:
PowerShell:
Get-WmiObject -Namespace Root\Ccm\LocationServices -Class SMS_ActiveMPCandidate | Where-Object {$_.Type -eq "Internet"}